Quick Jambalaya

FullSizeRenderOne-pot wonders. They are the saviors of the working woman (or man). The complexities of flavor in this chicken and sausage jambalaya recipe will make it a favorite at your house, just like it is at ours. When I first tried this concoction, we liked it so much I was making it once a week. My son’s girlfriend joined us for dinner a few nights, and this happened to be on the menu every single time! I had to apologize, telling her it really wasn’t the only thing we ever ate. Not sure if she believed me or not. Didn’t matter though—she loved it just as much as the rest of us, and didn’t mind having the dish repeated.

Traditionally, the New Orleans staple has seafood as well as meat, but we love this Martha Stewart quick jambalaya version with andouille sausage and chicken breast. My big cast iron and enamel Dutch oven* is perfect for stewing and simmering this casserole, and it ends up tasting like a dish that’s stewed all day, rather than 30-45 minutes. Sometimes I assemble this before work in the morning, simmer it for the suggested 30 minutes, and then put it in the frig. The whole pot can be reheated in the oven at 350° for about 20-30 minutes at dinner time. If you don’t have that much time to slam down supper, it reheats in the microwave perfectly well, too.

I couldn’t find the Old Bay seasoning from Martha’s recipe, so I subbed in all the seasonings you see listed below. I also found it needed less water than instructed in her recipe, and altered the cooking process a little as well. I’m sure Martha would be proud of me for being my own woman, and making it work for me.

Serves 6

1/4 cup olive oil
1 pound boneless, skinless chicken breast halves
Coarse salt and freshly ground pepper
1 medium onion, finely chopped
3 celery stalks, finely chopped
1 green bell pepper, stemmed, seeded, and finely chopped
1 pound andouille sausage, cut into 1/2-inch pieces**
2 garlic cloves, minced
2 cups homemade or store-bought chicken stock
1/4 teaspoon smoked Spanish paprika (or regular paprika)
1/8 teaspoon each dry mustard, cardamom, and ginger
Pinch each of celery salt, black pepper, crushed red pepper flakes, cloves, and nutmeg
1-2 bay leaves
1 can (14 ounces) diced tomatoes with juice
1 cup long-grain rice, uncooked

Heat olive oil in a Dutch oven over medium-high heat. Season chicken with salt and pepper. Cook until golden brown, about 5 minutes per side. Set aside to cool.

Add onions to pot and sauté for a few minutes alone, then add the rest of the vegetables to pot. Cook, stirring, 5 minutes. Add sausage; cook 3 minutes. Add garlic; cook 1 minute. Stir in stock, seasonings, and tomatoes; bring to a boil. Cut cooled chicken into 3/4-inch pieces, and add to pot with rice. Reduce heat; simmer for 30 minutes, covered. Stir one or twice. Serve.

*A cast iron and enamel pot is a great kitchen helper, and you do not have to spend a fortune on a Le Creuset dish to get good results. Macy’s carries a pot for under $75, and you can always use their 20% off coupons on merchandise (if you’re on Macy’s mail list). My work-horse of a pot was a gift from my son Brandon, when he was a poor college student, no less. He found one for under $40 at Home Goods, and it works wonderfully well. Thanks again, Brandon! It’s the gift that keeps on giving.

**NOTE: I use 4 links of andouille sausage, and freeze the additional link in the package for another pot of jambalaya. It’s plenty of meat and flavor, and cuts down on the cost a little.

Wild Rice Casserole

IMG_0647If you live in the Great Lakes region, you love wild rice, and you’re darn proud of it. It’s that food item you buy for friends visiting from other parts of the world, showing just how unique and versatile we are in the midwest. Hey, we are so much more than hotdish and hamburgers! But what can you make with it besides the old standby, wild rice soup? Here’s a side dish I came up with that goes great with summer’s grilled meats and fish, or winter’s roasted beef, pork, or poultry. You can make it with dried cranberries to give it a sweet twist, or mushrooms to make it savory. Either combination compliments this hearty grain, and gives everyone a much-needed break from potatoes or white rice. (The wild rice casserole pictured here is served with my husband’s Brined and Smoked Turkey.)

Serves 6-8

1 cup uncooked wild rice
4 cups water
1 cube chicken bouillon, or 1 teaspoon salt
1/2 cup yellow onion, chopped
8 ounces button mushrooms, sliced
(or use 1/3 cup sweetened dried cranberries—aka: craisins—but not both mushrooms and craisins)
½ cup pecan halves
3 tablespoons butter, divided

Rinse wild rice in colander under cold water. Combine wild rice, water, and bouillon cube in large sauce pan and bring to a boil. Reduce to low and simmer for 45 minutes, or until most of rice kernels are cracked open. Once rice is done, drain. Do a quick rinse of cold water to shock rice (halt cooking of grains). Drain again.

Preheat oven to 325° Fahrenheit. While rice is cooking, sauté onions in 1 tablespoon butter until translucent. Transfer cooked onions to 3 quart casserole dish. Add another tablespoon butter to pan and sauté mushrooms until cooked. Add to onions in dish. Add 1 tablespoon butter to pan, again, and toast pecan halves in butter about 3-5 minutes, or until they appear to darken slightly. Toss onions, mushrooms, and pecans with cooked wild rice in casserole dish. Cook, covered, in oven for 20-30 minutes or until heated through. Serve as side dish.

NOTE: If you prefer a tangier side dish, skip the mushrooms, and toast the pecans in 2 tablespoons butter. Then toss in 1/3 craisins with cooked rice. Cook in oven as directed above. Also, if you use salt instead of the chicken bouillon, this dish is vegetarian. It’s also gluten-free. Lose the butter, and it’s dairy-free and fat-free, but that’s going just a little too far.

Rhubarb Mint Coolers

Rhubarb Coolers IMG_0150Rhubarb is one of those early starters, and we usually have something on the table made with the tart ruby red stalks by end of May. Over the next couple weeks, there’s gonna be a rhubarb-o-rama as I post some favorite rhubarb recipes. Those of you in warmer climes probably can’t grow it since it’s a chill baby—it loves colder climates like Canada and the northern half of U.S. You Floridians will have to purchase frozen rhubarb in order to make the recipe below.

This recipe comes from the Epicurious website, and my friend Karin made the cooler and brought it to our house last July 4th. The pinkish-red color made it a natural for celebrating Independence Day, but she said she’s also served it on Valentine’s Day as well. (To serve mid-winter, make in the summer when rhubarb and mint are in abundance, and then freeze the mixture. Or make it in winter with frozen rhubarb, which is available all year.) She doubled the rhubarb amount from the Epicurious recipe, and then diluted the beverage with club soda* for fizz—half rhubarb drink and half club soda in each glass. Topped with a sprig of fresh mint, it was gorgeous as well as refreshing.

IMG_0636Even though the foliage is so pretty and impressive, remember that rhubarb leaves are toxic. Apparently this came to light in WWI when rhubarb leaves were used as a food source in Britain. (Thank you, Wikipedia.) Another fun fact about rhubarb, is that it’s useful for helping with constipation. (Thanks again, Wikipedia!) Not quite sure how much of it you need to ingest in order to reap those benefits… But I digress! Take a break from soft drinks and lemonade, and try this cooler as for a fresh, tart beverage to go with any meal.

Makes approximately 4 cups

4-5 cups chopped fresh or frozen rhubarb
5 cups water
1 cup sugar
1/4 cup packed fresh mint leaves, chopped
Garnish: fresh mint sprigs

Cut rhubarb into 1/4-inch pieces and, in a saucepan, combine with water, sugar, and mint leaves. Bring mixture to a boil. Reduce to simmer, and stir occasionally for 15 minutes (rhubarb will disintegrate). Cool for 15 minutes. Pour mixture through a fine sieve into a pitcher, pressing hard on solids to release extra flavor from the fruit. (Or is it vegetable? A New York court decided in 1947 that it would be classified as a fruit not a vegetable, which reduced the tariffs for importing and exporting. But again, I digress.) Chill mixture, covered, until cold, about 3 hours, and up to 2 days.

*NOTE: You can use club soda or seltzer. Both are inexpensive options compared to mineral water, which is naturally carbonated, and therefore more pricey. Club soda has some minerals added to it for flavor in addition to the bubbles, but seltzer is just carbonated water, and nothing else.

Chicken, Rice, and Almond Casserole

IMG_0693Casseroles feel like cold-weather comfort food, but this savory chicken and rice dish is such a people-pleaser that you can make it any time of year. This is my go-to recipe when I’m bringing a meal to a friend who’s in need of a meal, whether due to the happiness of a new addition or the heartbreaking loss of a loved one. It’s mild enough for even the pickiest eaters, yet has enough flavor to keep everyone coming back for seconds. Make this ahead of time, then cover and keep in the frig for a day or two, and bake up when needed. (I wouldn’t recommend freezing it as the milk or cream in it will curdle. It doesn’t affect the taste, just the appearance.) So how do you make this easy recipe even easier? By purchasing a rotisserie chicken from the grocery store instead of baking, boiling, or grilling your own chicken.

I got this recipe from a friend about 20 years ago, and can barely read my handwriting on the recipe card—that’s how much it’s been used! My guess is that it was published by the makers of Uncle Ben’s rice, as that’s the key ingredient, but I’ve got no proof of that. The recipe calls for half and half, which you can certainly use if you have it on hand. However, it’s great made with milk in place of the cream, especially if you’re watching fat in your food. (My farm-boy father would tell you to make it with cream. End of discussion.)

Serves 6

1 box Uncle Ben’s Long Grain and Wild Rice Original Recipe
1/4 butter
1/3 cup chopped onion
1/3 cup all-purpose flour
1 teaspoon salt
1/4–1/2 teaspoon course ground black pepper
1 cup half and half or milk
1 cup chicken broth
2 cups chopped, cooked chicken
1/4 cup slivered almonds

Preheat oven to 400° Fahrenheit. Prepare Uncle Ben’s rice according to package directions. While rice is cooking, melt butter in large sauce pan. Add chopped onion and cook on low until onions are translucent. Remove from heat and gradually sprinkle in flour, stirring until all the flour is combined. Add salt and pepper, stir again. Put pan back on low heat and gradually stir in cream or milk until flour mixture is smooth and creamy. Add chicken broth, and stir to combine. Turn heat to medium-high. Heat and stir until mixture is smooth and bubbly. In large bowl, combine milk mixture, cooked chicken, cooked rice, and almonds. Pour into 2 quart casserole dish and bake uncovered in preheated oven for 30 minutes.

NOTE: If using gluten-free chicken broth, this is a gluten-free recipe.

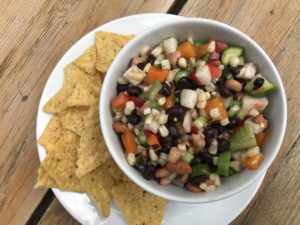
Cowboy Caviar

Tired of salsa? Give your chips something new to dip with this tasty and nutritious bean and veggie dish. I first had this when my neighbor Tutti made it for a beach party at her cabin. I made a total pig of myself, lingering over the snacks, dipping (and probably double-dipping) into this fresh take on salsa, sans the tomatoes. She finally asked me if I might like the recipe, most likely to get me to move away from the table. Tutti’s recipe had pimentos in it, but I’ve never had those on hand, and the red bell peppers do the job of adding that pop of red. I also add a few more vegetables than she did.

This travels really well, so it’s great for bringing on a picnic or serving at a potluck. I’ve sent this with the guys to cross-country camp for a healthy snack, and the coach LOVED it because the guys got extra protein and veggies—and even the ones who “didn’t eat vegetables” sampled this snack. You can add as many raw veggies as you like, just dice them so you don’t end up with just one large carrot on a chip.

If you have any leftover, this is great on top of chopped salad greens, with some diced grilled chicken. No salad dressing needed – the sauce does it all.

Makes 2 quarts

For Sauce:

1/2 cup apple cider vinegar
1/2 cup granulated sugar
1/2 cup olive oil
1 (14-ounce) can black beans, rinsed and drained
1 (14-ounce) can pinto beans, rinsed and drained
1 (14-ounce) can black-eyed beans, rinsed and drained
1 bunch green scallions, chopped
2-3 stalks celery, diced
2-3 carrots, peeled and diced
1 red pepper, diced
1/3 to 1/2 cucumber, diced
1 can shoe peg corn, does not need to be drained (vacuum-packed)
1 small can diced green chili peppers, drained
1/2 to 1 teaspoon fresh jalapeño, minced
Tortilla chips for serving

Combine vinegar, sugar, and oil in saucepan. Heat on medium until sugar is dissolved. In large bowl, combine all the beans and vegetables. Pour sauce over bean and vegetable mixture and stir to combine. Refrigerate 2-24 hours. Before serving, drain off excess marinate. Serve with tortilla chips.

NOTE: If you want to be extra-healthy, you can serve this with cucumber rounds instead of chips. Skip the cukes in the recipe, if you go that route.

Baked Beans with Bacon and Caramelized Onions

Baked-Beans-IMG_0676I had you at bacon, right? This baked bean dish is one I came up with through years of tweaking, and it’s the perfect accompaniment to grilled chicken or ribs, burgers or brats. The trick is to bake it low and slow—then the flavors really blend together. Next time you’re invited to your friends or neighbors for a barbecue, offer to bring these. You can make ahead a day or two, refrigerate, then bake an hour or two before the event. No last minute prep needed. 

If you want to try to appear classier than you actually are, you can put the beans in individual ramekins for your dinner guests. Then bake for about 45 minutes to 1 hour.

Serves 6-8

4-6 pieces of bacon
1 large onion, sliced into rings
2-3 cloves garlic, minced
2 (14 ounce) cans Bush’s baked beans, do NOT drain
1 (14 ounce) can black beans, rinse and drain
1 (14 ounce) can butter or cannelloni beans, rinse and drain
1/4 cup catsup
1/4 cup full-flavored molasses
1-2 tablespoons dark brown sugar, packed
1 tablespoon Worcestershire sauce
1 tablespoon vinegar
1 teaspoon dried mustard (or 1 tablespoon prepared mustard)
Dash each salt and pepper

IMG_0668Preheat oven to 300° Fahrenheit. Fry bacon in large frying pan until crisp. (If not cooked until crisp, bacon will turn soft when baked with beans.) Remove cooked bacon to plate lined with paper towels; cool. Add onions to bacon fat and sauté on medium to medium-high heat until onions are golden and caramelized (see photo). Add minced garlic and sauté 1-2 minutes longer, until garlic is golden brown. Drain off any excess bacon fat.

In large bowl, combine all the beans, catsup, molasses, brown sugar, Worcestershire sauce, vinegar, mustard, and salt and pepper. Add in caramelized onion mixture, and crumble bacon on top. Stir again until all ingredients are incorporated. Pour into 3-quart baking dish (casserole dish is better than 9″x12″ baking dish), and bake uncovered for 1 1/2 to 2 hours, or until sauce has thickened and darkened in color.

NOTE: If making ahead and refrigerating, let stand at room temp for an hour or so before baking, if possible.

And this recipe may not be low-cal, but it is gluten-free!

Vietnamese Rice Noodle Salad

IMG_0618This fresh and healthy Asian salad is perfect for a warm weather lunch, brunch, or served alongside whatever is on your grill for dinner. My sister Susan brought it to a party recently, and it was a hit. She found the recipe on allrecipes.com, but changed it considerably. The original calls for five, count ’em FIVE cloves of garlic, which is way too much raw garlic for a salad. She subbed in soy sauce for fish sauce as she didn’t have the fish sauce on hand, and added bell pepper, snow pea pods, and red cabbage to the vegetable mix. She said she’s also included edamame (boil according to package instruction then chill) when she’s made it previously. The drizzle of toasted sesame oil at the end was also her addition. Isn’t she clever? We thought so!

Serves 6-8

1-2 cloves garlic, minced
1 cup loosely packed cilantro, chopped
1/2 pepper, seeded and minced
1/4 cup fresh lime juice
3 tablespoons vegetarian fish sauce or 1 tablespoon soy sauce
3 tablespoons white sugar
1 (12 ounce) package dried rice noodles
2 carrots, julienned
1 cucumber, halved lengthwise and chopped
4 leaves Napa cabbage, julienned
1 red bell pepper, chopped
1/2 cup red cabbage, chopped
1/2 cup sugar snap peas, ends cut off
1/4 cup chopped fresh mint
1 tablespoon toasted sesame oil
1/4 cup salted dry roasted peanuts, chopped

Combine the minced garlic, cilantro, and jalapeño. Transfer the mixture to a bowl, add the lime juice, fish sauce (or soy sauce, and sugar; stir well. Let the sauce sit for 5 minutes.

Bring a large pot of salted water to a boil. Break the rice noodles in half and add them to the pot; boil them for 2 minutes. Drain well. Rinse the noodles with cold water until they have cooled. Let them drain again.
Combine the sauce, noodles, carrots, cucumber, Napa cabbage, bell pepper, red cabbage, sugar snap peas, and mint in a large serving bowl. Toss well; drizzle with toasted sesame oil. Toss again and serve the salad garnished with the peanuts.
(NOTE: if using a gluten-free soy sauce, this recipe would be gluten-free.)

Granola

Granola IMG_0628Take a break from the boring box of cereal, or Dickensian gruel. You can whip up a batch of this easy, healthy, and tasty granola in less than 30 minutes. If you’re a fan of Swiss German granola—called müesli—be warned this is the American version, drizzled in melted butter and honey, and baked. A few years back my husband and I visited Switzerland, and found that the “granola” served at the Swiss continental breakfast was raw oats, with no sugar or butter involved. It may have been healthier and fat-free, but I prefer my granola with a little sweetness and crunch to it.

I got this recipe from a friend of mine who was going through treatment for cancer, and she was trying to avoid all processed foods. She pushed the boxes, bottles, and cans aside, and found recipes like this to keep her healthy while she fought the fight. I’m not saying this recipe can cure cancer, but she pulled through, and happily shared this delicious recipe with me.

Makes 8-10 bowls

1/2 cup (1 stick) butter
1/2 cup honey
5 cups old-fashioned Quaker oats (do not use quick oats)
1/2 cup shredded or flaked coconut
1/2 cup chopped pecans
1/2 cup sliced almonds
1/2 cup golden raisins (or craisins)
1/2 cup raisins

Preheat oven to 375° Fahrenheit. In medium saucepan, melt butter and honey. Set aside. In large mixing bowl, combine oats, coconut, pecans, and almonds. Pour butter mixture over oats and stir to coat. Put half of oat mixture on a 13″x18″ baking sheet, and the other half on another baking sheet of same size. Bake both pans in the oven for 8-10 minutes. Stir oats on pans, and rotate in oven, and bake for another 8-10 minutes, or until golden brown. (Careful not to burn! Coconut takes on an unpleasant acrid odor when burned.)

Scoop toasted oats back into bowl, and add both raisins and golden raisins. Stir to combine. Store in airtight container, but let cool before closing completely. Shake container to break up as granola will clump as it cools. Enjoy with milk, or greek yogurt and fruit.

Haystack Taco Dip

Haystack Salad IMG_0608So many appetizers rely on a brick of cream cheese as base, but this taco-flavored dip is chock full of fresh ingredients like tomatoes and alfalfa sprouts—and no cream cheese! And it’s probably the best thing you’ll ever dip with a chip. It’s a great appetizer for graduation open houses or other buffets as it doesn’t need to be kept hot, or cold. In fact, that’s where I first tasted this concoction, at my friend Laurie’s open house for one of her daughters. Laurie called her recipe “Haystack Salad,” but my family has always called it “that taco dip.” Laurie’s directions were to use a can of Hormel no bean chili as the base, or refried beans in a pinch. It seems Hormel has quit producing that item—I’ve not been able to find no bean chili for several years now, and the refried beans work perfectly well instead.

One way to make this dip extra great, is to get some Penzy’s taco seasoning. It has less salt and more flavor than the stuff you get in the foil packets at the grocery store. You can order the taco seasoning through Penzy’s website, and hey, grab some cinnamon and vanilla while you’re at it! (Last time I ordered, they shipped free with a $50 order, so you might as well stock up on other spices and seasonings.)

The other thing you’ll like about this appetizer, is that it goes together in about 15 minutes (or less if you enlist the help of someone to shred cheese) and requires no baking. Have I convinced you to try this one yet?

Serves 10-12

1 – 16 ounce can of refried beans
4 tablespoons Penzy’s taco seasoning or 1 package of other taco seasoning
3 ripe avocados
1 cup sour cream
3 tablespoons fresh lemon juice
1 – 4 ounce can of diced mild green chilies
1 – 4.25 ounce can of chopped ripe olives
1/2 cup chopped scallions (about 4 scallions)
1 cup shredded monty jack cheese
1 cup shredded sharp cheddar cheese
3 tomatoes, diced
1/3 to 1/2 container of alfalfa sprouts
Tortilla or corn chips

Combine refried beans and taco seasoning in a small bowl. Spread on the bottom of a glass 9″x13″ baking dish. In another small bowl, add avocados, sour cream, and lemon juice together and mash until combined. Spread on top of the refried bean mixture. Drain the green chiles, and sprinkle on top of the avocado layer, followed by the chopped ripe olives, then the scallions. Next sprinkle monty jack cheese, and then cheddar cheese. After dicing the tomatoes, strain them to get rid of the extra juice. Add tomatoes on top of the cheeses, and finish with the alfalfa sprouts. If not serving immediately, cover with plastic wrap and refrigerate for up to 24 hours. Serve with tortilla or corn chips. But remember, no double-dipping!

Black Bean Soup

Black Bean Rice Bowl IMG_0601You’ll yield a wonderful, slow-cooked flavor when you simmer this black bean soup on the stove top. This is a Saturday soup as it needs a few hours of simmering to soften the beans, but it’s totally worth the wait. Serve this over some über-healthy brown rice and it’s a whole meal. 

It makes a hearty batch—about a gallon—so you’ll have plenty leftover for lunch at the office, or dinner some night when you’re in a rush. I usually package up a quart to give to my son Justin who lives on his own, and he’s always thrilled to get this in his “mom” bag. Another plus to this recipe? It’s a budget buster. I think I figured this costs about a buck a bowl to make. As for the origins of this recipe, I got it from my girlfriend’s mother several years ago, and it’s scribbled on the back of a hockey practice schedule. I can’t tell you any more than that!

(My husband thinks I should have captioned this photo: “Husband starves to death while wife does photo shoot of his dinner for blog.” He’s fine, people, really, he’s just fine.)

Serves 8

1 pound dry black beans
1 teaspoon vinegar
1 ham shank or meaty ham bone
1 yellow onion, chopped
¾ cup celery, chopped
½ to 1 green pepper, chopped
1 clove garlic, minced
1 can (15 ounce) tomato sauce
1 tablespoon Worcestershire sauce
2 teaspoons salt
1 teaspoon cumin
½ teaspoon black pepper
½ teaspoon oregano
1 cup brown rice, cooked according to package directions
Sour cream (optional)

Cover the black beans with cold water in large Dutch oven, and soak overnight. Drain and rinse beans, then add fresh water to 1-inch above beans. Bring beans to a boil, then add vinegar and ham shank or bone. Reduce to simmer and cook for 2 hours.

Remove ham shank or bone from soup and set on plate to cool. In sauté pan on medium heat, cook onions until translucent. Add celery and green pepper, and cook until tender. Add garlic and cook a minute more. Add tomato sauce, salt, pepper, cumin, and oregano and stir to combine. Stir vegetable mixture into cooked beans. Return heat to high and bring mixture to a boil. Reduce heat to simmer, and cook another hour with cover cracked open to allow steam to escape. Soup should reduce down and thicken as it cooks.

Remove as much meat as possible from the ham bone and shred. Add meat to soup and stir to combine. Serve over cooked brown rice. If desired, top with sour cream.