Raspberry-Rhubarb Slab Pie

FullSizeRenderWhen my rhubarb plant got beaten up in a fierce summer storm, I needed to get creative in the kitchen and use it or lose it. Browsing online, I came across this raspberry and rhubarb dessert (from tasteofhome.com) that sounded like a fun departure from my usual go-to rhubarb recipes. Plus, I’ve never made a pie crust—unless we did a pastry session in 7th grade foods class. Who can remember? At any rate, I thought I should get outside my baked-goods comfort zone and challenge myself a little.

Whoever coined the phrase “easy as pie” was on drugs. What’s so “easy” about PIE??? I followed the instructions for making the pastry, and got ready to roll out the dough. The directions were to roll it out between layers of waxed paper, but it was too flimsy and the dough was slipping all over the counter and the flour was flying. So I switched to floured parchment paper, and that worked a little better, but it was still no picnic. (That’s another expression I don’t get… Doesn’t making a full meal to bring on a picnic rank up there in culinary challenges? I find it exhausting.)

The next hurdle was trying to get the dough evenly distributed—equal thickness, and sorta in a rectangular shape. After 3 hours (or so it seemed) of huffing and puffing, I did finally get the bottom piece rolled and ready for the fruit filling. But then I had to do it again for the top! Ugh. I just about stabbed myself with the rolling pin. The end result was quite tasty, but I don’t think I’ll be winning any ribbons at the Fair in my lifetime.

On a scale of 1 to 10, I’d give it an 8. I loved the sweet-tart combination of the raspberry and rhubarb, and it was a nice change of pace from strawberry-rhubarb. It would be a fabulous treat to bring to a potluck, as it serves two dozen. I also liked that it was slimmer than a piece of pie, and the crust to fruit-filling ratio was perfect. Had my crust not been so tough, it would have been a perfect dessert. Next time, I’ll buy the Pillsbury refrigerated pie crusts* and save my sanity.

Makes 18-24 servings

3 1/4 cups all-purpose flour
1 teaspoon salt
1 cup butter
3/4 cup plus 1 to 2 tablespoons 2% milk
1 egg yolk
2 cups sugar
1/3 cup cornstarch
5 cups fresh or frozen unsweetened raspberries, thawed and drained
3 cups sliced fresh or frozen rhubarb, thawed and drained

VANILLA ICING

1 1/4 cups confectioners’ sugar
1/2 teaspoon vanilla extract
5 to 6 teaspoons 2% milk

 In a large bowl, combine flour and salt; cut in butter until crumbly. Whisk 3/4 cup milk and the egg yolk; gradually add to flour mixture, tossing with a fork until dough forms a ball. Add additional milk, 1 tablespoon at a time, if necessary. Divide dough into two portions so that one is slightly larger than the other. Wrap each in plastic wrap and refrigerate 1 hour or until easy to handle.

Preheat oven to 375° Fahrenheit. Roll out larger portion of dough between two large sheets of lightly floured parchment paper into an 18″x13″ rectangle. Transfer to an ungreased 15″x10″x1″ baking pan. Press onto the bottom and up sides of pan. Trim pastry to edges of pan.

In a large mixing bowl, combine sugar and cornstarch. Add raspberries and rhubarb, tossing to coat. Spoon into pastry. Roll out remaining dough and place over filling. Fold bottom pastry over edge of top pastry; seal with a fork. Prick top with a fork.

Bake 45-55 minutes or until golden brown. Cool completely on a wire rack.

For icing, combine confectioners’ sugar, vanilla and enough milk to achieve a drizzling consistency; drizzle over pie. Cut pie into squares. Serve warm or room temperature with ice cream.

NOTE: If using frozen rhubarb, measure rhubarb while still frozen, then thaw completely. Drain in a colander, but do not press liquid out.

* Pillsbury also makes a gluten-free refrigerated pie crust option.

Spicy Hummus

IMG_0899We used to think Trader Joe’s hummus was da bomb, until we tried this recipe from Rachel Ray’s website. Now we mix up our own fresh hummus whenever we have a hankering for a dip to use with pretzel flats, pita chips, or cukes, carrots, and pea pods. This is also great on fajitas, and it keeps in the frig a couple weeks, so no need to make it when you’ve got a bunch of other stuff to chop and saute. (Note: You will need a food processor or blender to get the desired smooth consistency.) I’ve tweaked the recipe each time I’ve tried it, and those changes are reflected below. Turns out tahini (a sesame seed paste found in either with the olives, or in the ethnic food aisles) is the secret ingredient that gives hummus it’s creamy texture and slightly nutty taste.

(Hey Judy! Here’s another recipe that uses the coriander you bought to make the Savory Sweet Potato Biscuits.)

Makes 6-8 servings

1 (14.5-ounce can) garbanzo beans, rinsed and drained (also called chickpeas)
2 rounded tablespoons tahini paste
1/4 cup olive oil
1 lemon, juiced
1 clove garlic, peeled and chopped
1 teaspoon ground cumin
1 teaspoon coriander
1/2 teaspoon crushed red pepper flakes
Course salt to taste

Combine all ingredients in food processor bowl and pulse until mixture is smooth and creamy. Transfer to small bowl and serve with pita chips or veggies. Or store in airtight container in frig for 2-3 weeks.

Slime

FullSizeRenderAnyone heard “I’m boooooorrrrr-ed!” from a kid this summer? Here’s an activity that’ll keep kids occupied for hours on end. You can buy Gak (Nickelodeon’s name for it) at Toys “R” Us, but making your own Slime or goop—or whatever you want to call it—is way more fun. What magic powder turns simple glue into goo? Borax. It hooks the glue’s molecules together, making it into a polymer instead of a liquid. (Actually, according to my Physics/Chemistry major son, it is now a non-Newtonian fluid.)

Kid’s of all ages (like smarty-pants college-age Mitch—those aren’t pre-school arms pictured above…) love the tactile sensation of Slime, and you may have trouble prying it away from adults to let the kids have at it. Just be warned that Slime and fabric are disastrous together, so keep it clear of your favorite tablecloth, jeans, barbie outfits, etc. It should be played with on a hard surface, with plastic or wood utensils or toys. And that’s the end of my disclaimer, so don’t come crying to me when you’ve got Slime stuck in your sleeping bags. (Been there, done that.)

Aside from pulling out this science experiment for bored kids in the summer, I also used to keep an “I’m Bored Jar” on the kitchen counter. Whenever my offspring uttered that dreaded phrase, they had to pick a piece of paper from the jar. They might get a fun activity like making Play-Doh or a marshmallow gun, or they might get a chore like picking up Legos or cleaning mirrors. After vacuuming Mom’s van (kidding…sort of), they learned to entertain themselves.

Makes 1 cup

4 or 7.62 ounce bottle of Elmer’s school glue
(Size of bottle doesn’t make a difference in outcome, but little kids will have an easier time managing the Slime made with 4 ounce bottle.)
2 cups distilled water, divided
10 + drops of food coloring
1 teaspoon Borax powder

1. Pour glue into small bowl. Fill the empty glue bottle with distilled water, leaving a little extra room at top. Add food coloring. (To get a lime green, add yellow food coloring to your water first, plus a few drops of green.) Put cap back on bottle and shake vigorously.

2. Pour colored water into bowl with glue and stir with wooden spoon.

3. In separate bowl, combine 1 cup distilled water and the Borax.

4. Slowly pour the colored glue into the Borax water and slowly stir. You will see globs and strings begin to form. Lift the globs out of the bowl with your hands and knead out water until smooth. Add extra strings of glue as you can, and combine.

5. Store in Ziplock back or plastic container with tight-fitting lid.

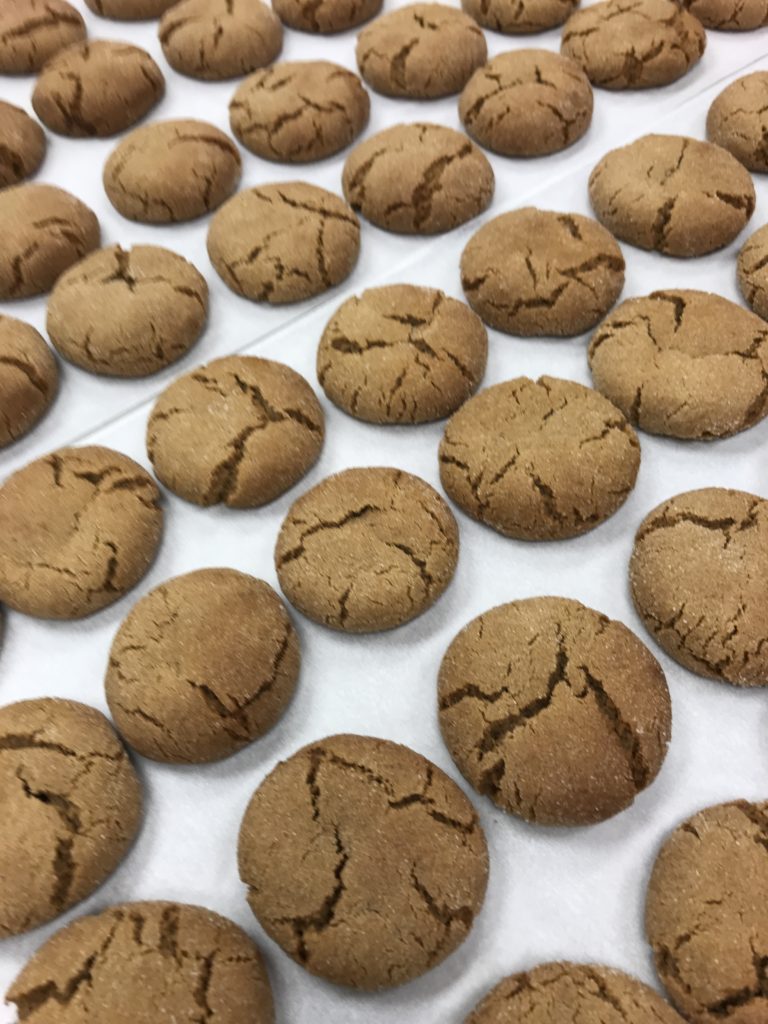
Ginger Crinkles

We’ve all bitten into gingersnap cookies that are so hard you practically break a tooth on them. This soft, chewy cookie has all the sweetness and spice of a gingersnap, but none of the dental danger. And these Ginger Crinkles are SO good, my 30-something nephew Jacob actually asked for a take-home bag when he and his wife had been over for dinner once. He said he wasn’t really a cookie person, but thought he’d try one to be polite, and then couldn’t stop.

It helps to serve them nice and warm, fresh from the oven, although they keep well in an airtight container. They’re a great fall and winter cookie, since they use the same spices as gingerbread, but your family—and guests!—will be happy to eat them year round. (I like to make these when Chocolate Chip and/or Monster Cookies are boring me. A nice change of pace.)

I found the recipe on the McCormick spice site several years ago, but it is no longer posted. They had used corn syrup in their recipe (which I don’t keep on hand), so I tried molasses instead. Worked great! And probably added more flavor, too. 

Makes 2 ½ dozen cookies

1 cup butter, softened to room temperature
1 ¼ cups granulated sugar
¼ cup dark molasses
1 egg
1 teaspoon vanilla
3 cups flour
2 teaspoons ground cinnamon
1 ½ teaspoons baking soda
1 teaspoon ground ginger
¼ teaspoon ground cloves
¼ teaspoon salt
¼ cup granulated sugar (for rolling cookies)

Preheat oven to 375° Fahrenheit. In large mixer bowl, cream butter. Slowly add white sugar, then molasses, and beat with electric mixer until fluffy. Add egg, and cream all ingredients. Add vanilla, and cream ingredients again.

In separate medium-size mixing bowl, combine flour, cinnamon, baking soda, ginger, cloves, and salt. Stir with spoon. Slowly add flour mixture to creamed butter and sugar mixture. Remove bowl from mixer.

Put ¼ cup white sugar in small bowl. Take spoonfuls of cookie dough and roll into balls. Roll each ball in sugar before placing on baking sheet. Bake in oven for 10-12 minutes. Remove pan from oven and cool for 5 minutes before removing cookies from baking sheet. Store in airtight container.

Lemon Caesar Salad Dressing

IMG_0919Fresh summer salads need a fresh summer dressing, and what tastes fresher than the zing of real lemon? This dressing recipe make-over from a Pillsbury Classic Cookbook circa August 1991 (those little grocery store booklets sold in the check-out lanes next to the trashy tabloids) uses sour cream as a thickening agent instead of the traditional coddled egg, so there’s no raw egg issues in this mix. I’ve made it with just torn romaine lettuce, grated Parmesan cheese, and big, buttery croutons, but that’s too limiting for this zesty salad topper. It’s great on any torn greens and vegetable combination you can dream up.

IMG_0924Pictured in my salad are curly leaf lettuce, chopped sweet red peppers and cucumber, jicama chunks, fresh basil, and grated heritage carrots (they’re purple—so they kinda look like bacon bits), and finally a sprinkling of grated Parmesan, as a nod to it’s Caesar roots. Be warned that lemon is the predominant taste in this dressing, so pucker up. (Mom and Janine, this one’s for you!) I’ve never used the anchovy paste suggested in the original recipe, and we’ve found it’s just dandy without it. In fact, I think it would make it far too salty. 

Most people know how Caesar salad got it’s name…but here’s a refresher just for kicks. It was created by Chef Caesar Cardini, an Italian immigrant who worked in kitchens in Mexico and the U.S. Legend has it that he came up with the concoction during a 4th of July rush when his kitchen supplies were running low, and these were the ingredients he had on hand. His original recipe didn’t use anchovies, either, so I guess I’m in good company there. Apparently, there are a variety of bottled dressings called “Cardini’s Caesar” to be found in grocery stores. But why buy it bottled when it’s so easy to make your own?

Makes about 3/4 cup dressing

1/2 cup extra virgin olive oil
3 tablespoons fresh lemon juice
1 tablespoon sour cream
1 teaspoon grated lemon peel
1 teaspoon Dijon mustard
1 teaspoon Worcestershire sauce
1-2 cloves garlic, minced (I typically use only one clove)
1/2 teaspoon salt
1/4 teaspoon course ground black pepper

Combine all ingredients in a bowl and whisk—or combine in a jar and shake vigorously—until smooth. Refrigerate until ready to use, or pour over salad greens and vegetables, and toss until greens are coated.

Peanut Butter Protein Balls

IMG_0905Great for packing in a school lunch, taking camping, or simply for snacking, these peanut butter balls have been a family favorite of ours for years. This simple recipe was published in Family Fun magazine a bazillion years ago, part of an article on school lunch boredom-busters. Super easy to make—mom or grandma can measure, and kids can mix and shape balls. If spheres are too boring for your bunch, shape into snakes and spirals, or whatever your little heart desires.

My now 20-year-old son still loves these, and I’ll make him a stash to store in his dorm room, where he can enjoy them after a brutal physics exam. So these aren’t just for wee ones! We’ve also served them in little petit four cups along side chocolate truffles, and they hold their own with the fancy foods. They keep their shape best if you freeze them, and then they’re perfect for packing in a lunch or bringing on a picnic—they thaw quickly and are ready for consumption by the time you reach your destination.

Makes 12-15 balls

1 cup super chunky peanut butter
1/2 cup nonfat dry milk powder
1/2 cup raisins (optional—they make these more challenging to shape)
1/4 cup honey
2 graham crackers, crushed into crumbs

Combine peanut butter, dry milk, and honey (and raisins, if desired), and stir until all ingredients are incorporated. Scoop out teaspoonfuls of dough, and roll into balls. Put graham cracker crumbs in small bowl, and roll balls in crumbs to coat. Serve as is, or refrigerate or freeze in airtight container. (We prefer to freeze them.)

Squirrel Bars

IMG_0896Don’t worry—no squirrels were harmed in making these scrumptious chocolate and pecan bars. Originally called “Chocolate Nut Toffee Bars,” this recipe came from a magazine insert promoting Eagle® Brand Sweetened Condensed Milk and Hershey’s products. And of course there’s a story behind our re-naming… The first time I made these, I set them out on our porch to cool. When I went out to get the bars an hour later, all the nuts had been stealthily removed, and there were tiny little claw marks marring the top chocolate layer. It looked like a miniature version of Wolverine had attacked the pan. Henceforth, the bars have been called “Squirrel Bars” at our house. We have often wondered if some poor little squirrel needed a few cavities filled after digging into our treats…

The bottom layer is similar to shortbread, only cocoa powder has been added to give the crust a chocolate twist. As simmered sweetened condensed milk makes up the middle layer, and just chocolate chips and nuts top them off, they whip up rather quickly. The hardest thing about this recipe is waiting for them to cool so you can eat them. But if you happen to be a squirrel, no need to wait. Feel free to dive right in.

Makes 24-36 bars

1 cup butter, softened (divided)
1 cup confectioners sugar
1 1/4 cup all-purpose flour
1/3 cup Hershey’s cocoa powder
1 (14-ounce) can Eagle® Brand Sweetened Condensed Milk (NOT evaporated milk)
2 teaspoons vanilla extract
1 cup (6 ounces) Hershey’s Semi-Sweet Chocolate Chips*
1/2 cup chopped pecans or walnuts

Preheat oven to 350° Fahrenheit. Grease 9″x13″ glass baking dish. Set aside 2 tablespoons of the softened butter for use later. In large mixer bowl, beat remaining butter and sugar until fluffy. Add flour and cocoa, mix well. With floured hands, press cocoa mixture into bottom of prepared baking pan. Bake in preheated oven for 15 minutes. Meanwhile, in medium sauce pan, combine reserved butter and sweetened condensed milk. Cook on medium to low heat, stirring frequently, until mixture thickens slightly, about 15 minutes. Remove from heat, and stir in vanilla. Pour over baked crust. Bake 10 minutes longer, or until golden brown. Remove from oven and immediately top with chocolate chips. Let stand 1 minutes, then smooth out melted chips with back of large spoon while still warm. Top with nuts. Cool. Cut into bars. Store covered at room temperature.

*I’m a fan of Nestle’s Semi-Sweet Chocolate Chips myself, but I have to be true to the originators of the recipe here.

Marynona’s Potato Salad

IMG_0903People who say they aren’t a fan of potato salad have only had bland deli fare. My mother-in-law was the master at making tasty potato salad, chock full of crunchy celery and onions, and lots of hard-boiled eggs. (I may have overdone it a bit on the eggs the last time I made this, as my nephew Brock said, “So Aunt Cheryl, is this egg salad with potatoes in it, or potato salad with eggs in it?”) Marynona’s secret to making great potato salad, was not only plenty of mustard and seasonings, but to add your mayo and seasonings to the bite-sized potato chunks while they are still warm, so the potatoes absorb the flavors. She also insisted that you must use real Hellmann’s mayonnaise, and not Kraft Miracle Whip, or another brand of mayo. I do agree with her—Hellmann’s really does make a difference. It also helps to make this at least 3 hours before serving time to give it time to chill, and for the flavors to blend.

Serves 6-8

6 eggs
8-10 red potatoes, cut into bite-sized pieces (do not peel)
1-2 teaspoons salt
1 to 1 1/4 cups Hellmann’s real mayonnaise
2 tablespoons prepared mustard
2 teaspoons Dijon mustard
2 teaspoons dill weed
1 teaspoon salt
1/4 teaspoon course ground black pepper
2 tablespoons white vinegar
2-3 stalks celery, chopped
1 medium yellow onion, chopped, or 1/2 large red onion, chopped
2 tablespoons chopped fresh chives, optional

Place eggs in medium sauce pan and cover with cold water; cover. Bring water to boil. Turn element off and let eggs sit in hot water for 10 minutes. Dump out water and run cold water over eggs. Remove shells from eggs; set aside.

Place potatoes in large sauce pan or small Dutch oven, and cover with cold water. Add 1-2 teaspoons of salt. Bring to a boil. Reduce heat and cook 10-15 minutes, or until potatoes are tender to fork. Once cooked, drain the potatoes in a colander. Let cool until potatoes are no longer steaming, but are still warm.

Meanwhile, combine mayonnaise, mustards, dill, salt, and pepper in large bowl. Stir. Add vinegar and stir again. Fold in celery, onions, and chives (if desired). Dice hard boiled eggs and add to mixture; stir again. Add warm potatoes and gently stir until potatoes are all coated with mayo mixture. Cover bowl with plastic wrap and refrigerate. After chilling 1 hour, stir salad and refrigerate for another 2 hours. If not serving at this time, move to airtight plastic container and store in frig for up to 1 week.

Classic Baby Back Ribs

IMG_0681With the 4th of July just around the corner, it’s the perfect time to share our favorite baby back rib recipe. These super savory morsels of meat take a few hours on the charcoal grill, but they are totally worth the wait. My husband Rich found this recipe on Weber’s website, and aside from his apostasy of Weber and zealous love of his new-found Big Green Egg, he follows the recipe pretty closely—minus the homemade barbecue sauce. We have someone with an allergy to tomato-based foods in our family, so he avoids brushing any BBQ sauce onto the ribs while grilling. There is also a philosophy out there in manly grilling land that says adding barbecue sauce to meats makes them char, as tomato has a low burning point. Those in the “dry rub” camp say, add your sauce when you’re eatin’, not when you’re cookin’.

What goes great with these tender, smoky ribs? Any of these recipes already posted on my blog: Corn Bread or Savory Sweet Potato Biscuits, Curry Cabbage and Vegetable Salad, Mean Mexican Rice or Baked Beans with Bacon and Caramelized Onions. For refreshments, try Mint Lemon Sweet Tea, Fresh Lemonade, or Rhubarb Mint Coolers—and follow your super summer meal up with warm Strawberry Rhubarb Crisp. My mother-in-law Marynona’s famous Potato Salad recipe (another summer time staple) will be posted soon. Never fear—I’ll be sure all your warm-weather dietary desires are covered!

Serves 4 to 6

Rub

2 tablespoons kosher salt
2 tablespoons paprika
4 teaspoons granulated garlic
4 teaspoons pure chili powder
2 teaspoons ground black pepper
1 teaspoon ground cumin

Ribs

4 racks baby back ribs, each about 2 pounds
4 medium chunks of hickory wood, soaked in water for at least 30 minutes

Mop

1 cup apple juice
3 tablespoons cider vinegar
2 tablespoons unsalted butter
2 tablespoons barbecue sauce (from above)

Mix all the rub ingredients in a small bowl. Set aside.

Using a dull knife, slide the tip under the membrane covering the back of each rack of ribs. Lift and loosen the membrane until it breaks, then grab a corner of it with a paper towel and pull it off. Season the ribs all over with the rub, putting more on the meaty sides than the bone sides. Arrange the ribs in a rib rack, with all the ribs facing the same direction. Allow the ribs to stand at room temperature for about 30 minutes, or until the surface looks moist, before grilling.

Fill a chimney starter to the rim with charcoal and burn the charcoal until it is lightly covered with ash. Spread the charcoal in a tightly packed, single layer across one-third of the charcoal grate. Place a large disposable drip pan on the empty side of the charcoal grate. Fill the pan about halfway with warm water. Let the coals burn down to low heat (250° to 300°F). Leave all the vents open.

When the fire has burned down to low heat, add two hickory wood chunks to the charcoal. Put the cooking grate in place. Place the rib rack over indirect low heat (over the drip pan) as far from the coals as possible, with the bone sides facing toward the charcoal. Close the lid. Close the top vent about halfway. Let the ribs cook and smoke for 1 hour. During that time, maintain the temperature between 250° to 300°F by opening and closing the top vents. Meanwhile, make the mop.

Make mop: In a small saucepan mix the mop ingredients. Simmer for a few minutes over medium heat to melt the butter, and then remove the saucepan from the heat. Or melt butter in microwave, and add other mop ingredients and stir.

After the first hour of cooking ribs, add 8 to 10 unlit charcoal briquettes and the remaining two wood chunks to the fire. At the same time, lightly baste the ribs with some mop. Leaving the lid off for a few minutes while you baste the ribs will help the new briquettes to light. Close the lid and cook for another hour. During that time, maintain the temperature of the grill between 250° to 300°F by opening and closing the top vents.

After 2 hours of cooking ribs, add 8 to 10 unlit charcoal briquettes to the fire. Remove the ribs from the rib rack, spread them out on clean work area and baste them thoroughly with some mop. Put them back in the rib rack, again all facing the same direction, but this time turned over so that the ends facing down earlier now face up. Also position any ribs that appear to be cooking faster than others toward the back of the rib rack, farther from the charcoal. Let the ribs cook for a third hour. During that time, maintain the temperature between 250° to 300°F by opening and closing the top vents.

After 3 hours of cooking ribs, check if any rack is ready to come off the grill. They are done when the meat has shrunk back from most of the bones by ¼ inch or more. When you lift a rack by picking up one end with tongs, the rack should bend in the middle and the meat should tear easily. If the meat does not tear easily, continue to cook the ribs. The total cooking time could be anywhere between 3 to 4 hours. Not all racks will cook in same amount of time. Lightly brush the cooked ribs with some sauce and, if desired for crispiness, cook them over direct heat for a few minutes. Transfer to a sheet pan and tightly cover with aluminum foil. Let rest for 10 to 15 minutes before serving. Serve warm with barbecue sauce on the side.

Caramel Candy Bars

IMG_0884Some foods are good because of the warm memories attached to them as much as the ingredients. These gooey caramel and chocolate bars fall into that category. My mother always made these for trips to my cousin Dale’s lake property, and my sisters and I couldn’t wait to get to Swan Lake—of course we were pumped to go water skiing, but digging into these decadent bars was a top priority, too. Mom would make a couple batches, cut and stack them in a Folger’s coffee can with wax paper between each layer, and stash ’em in the freezer. (Unlike most baked goods, these suffer no ill-consequences from being frozen!) Once these were pulled from their secret hiding place, the frozen squares would thaw in about 15 minutes, and were the consistency of a chewy candy bar. With mouths full of chocolate-caramel goodness, we could forget about itching our mosquito bites for a while. (And how deathly afraid we were to go to the latrine alone.)

A couple nights ago, we took a trip down memory lane when my Mom brought over a pan of bars. They were even better than I remembered—partly because this time we weren’t covered in mosquito bites, and dreading trips through the dark woods to the outhouse.

These are very similar to the Pillsbury Bake-off Carmelita Oat Bars (to be posted later), except this recipe uses caramel candies, more butter, and has double the amount of chocolate chips and nuts. More butter, chocolate, and nuts? Can’t go wrong there.

Makes 45-48 bars

Crust

2 cups All-purpose or unbleached flour
2 cups old-fashioned oatmeal
1 1/2 cups firmly packed brown sugar
1 teaspoon baking soda
1/2 teaspoon salt
1 1/2 cups margarine or butter, softened

Filling

64 Kraft caramels, unwrapped*
1/2 cup half and half, or milk
2 cups semisweet chocolate chips
1 cup chopped walnuts

Heat oven to 350° Fahrenheit. Grease large baking sheet (10″ x 15″). In large bowl, combine flour, oatmeal, brown sugar, baking soda, salt, and butter; mix at low speed until crumbly. Reserve half of crumb mixture (about 3 cups) for topping. Press remaining crumb mixture in bottom of greased pan. Bake in preheated oven for 10 minutes.

Meanwhile, combine caramels and milk in glass bowl or large glass measuring cup, and heat on high in microwave for about 3 minutes, or until mixture can be stirred smooth.

Remove partially baked crust from oven; sprinkle with chocolate chips and nuts. Drizzle evenly with melted caramels; sprinkle with reserved crumb mixture. Return to oven; bake an additional 15 minutes or until golden brown. Cool 30 minutes to 1 hour, then cut into bars. Store bars in airtight container with wax paper between layers. They can be left at room temp once completely cooled, or frozen to be served at a later time.

*This is a bit of a chore. If unwrapping these candies is too tedious for you, call my Dad. He has the patience of a saint and happily performs the task, knowing the end result will be some sinfully delicious treats.