Greek Salad

FullSizeRender-1Leery of trying a Greek salad without feta and creamy dressing? I was too, until I tried this recipe from the Whole30 book, and enhanced it a bit to make it more to my liking. (Added spinach, avocado, jicama, cilantro, and used cherry tomatoes instead of whole tomatoes…Also layered instead of tossing.) The fresh ingredients and lemony dressing made for a tasty whole meal salad when topped with grilled, chopped chicken breasts. I made four salads—two to eat right away, and two for lunches the next day, but if you’re making it as a side salad, it should serve 6. We loved it, even without our beloved feta crowning the greens.

Serves 4-6

For dressing:
¼ cup extra-virgin olive oil
2 tablespoons red wine vinegar
Juice of ½ a lemon
1 clove garlic, minced
¼ teaspoon salt
¼ teaspoon coarse ground black pepper

For salad:
1 head romaine lettuce, chopped
½ of a 6-ounce bag of ready-to-eat fresh spinach, chopped
1 cucumber, chopped
3-4 thick slices of jicama, diced
½ of container of cherry or grape tomatoes, halved
½ of red onion, minced
1 avocado, chopped
1 (12-ounce) jar of Kalamata olives, drained and halved
½ cup fresh cilantro leaves, chopped

Top with:
Grilled chicken breasts, chopped (optional)

Combine all dressing ingredients in a small bowl or jar and whisk or shake. Set aside.

Layer individual serving plates or large platter with lettuce and spinach. Add the remaining ingredients one at a time, starting with cucumber, and ending with cilantro. Drizzle with dressing. Add cooked chicken, if desired. Serve.

NOTE: This salad was great second day, not something you can usually say about a pre-dressed salad. I think that layering ingredients and drizzling dressing on top instead of tossing helped things stay fresh. It also helps avoid the dreaded gravity salad situation—when all the delightful heavy ingredients (like cukes and avocados) sink to the bottom, leaving only greens on top. Store in airtight container if making for next day.

Sausage, Apple, and Acorn Squash Casserole with Egg

IMG_1507Are you a serial cereal eater? Is it hard to imagine starting your day without your oatmeal or O’s? I didn’t think I could have energy for the day without my morning oatmeal, and that was the scary part of going Whole30 for me. But then I was paging through the Whole30 book and found this gem under “Fancypants Meals,” intended for part of a holiday dinner. It had a list of ingredients I love: portabella mushrooms, apple, acorn squash, and pepitas (pumpkin seeds), so I made it for supper one night to go with our grilled meat and roasted veggies. The next morning, I pulled out the leftovers for breakfast, heated a small plate of it in the microwave, and topped it with an over-easy egg. It’s become my new favorite breakfast! How did I exist on gruel all these years, like some middle-class, middle-aged Oliver Twist?

Serves 4-6

For sausage:
1 tablespoon ghee (or other Whole30 approved cooking fat)
½ of 1 yellow or white onion, minced
1 pound ground pork
½ teaspoon dried sage
½ teaspoon salt
½ teaspoon coarse ground black pepper
¼ teaspoon garlic powder

For casserole:
1 tablespoon ghee (or other Whole30 approved cooking fat)
1 acorn squash, peeled, seeded, and diced
1 (10-ounce) container of baby bella (crimini) mushrooms, sliced
1 apple, peeled and diced
1 teaspoon dried sage
½ teaspoon thyme
½ teaspoon ground rosemary
¼ cup pepitas or chopped pecans
Salt and coarse ground black pepper

For breakfast:
1-2 eggs

Preheat oven to 375°. Heat large frying pan on medium-high heat, and add ghee. Add ground pork and seasonings from sage to garlic powder, and stir and cook until pork is no longer pink. Add another tablespoon of ghee, and squash, mushrooms, and apple. Cook until fork-tender, about 5 minutes. Add the seasonings* and pepitas or nuts and transfer to a 9″x12″ glass baking or 2-quart casserole dish. Roast for 10-15 minutes. Add salt and pepper to taste. Serve as side dish for dinner, or cool, then transfer to a airtight container and refrigerate.

For breakfast, ladle a generous cup of casserole onto microwave-safe plate. Heat on high for 1 minute. While casserole is heating, fry up 1-2 eggs in a teaspoon of ghee, sunny side up, or over easy. Place egg on top of sausage casserole and sprinkle with salt and pepper.

NOTE: The Whole30 recipe used poultry seasoning, which I did not have on hand, so I used sage, rosemary, and thyme. (I didn’t add parsley, as I wasn’t in the mood for a Simon & Garfunkel song. Wait for it…wait for it…got it?) The book also suggested using ground turkey or chicken as well as the pork, but I felt the pork paired best with the mushrooms in this dish. They also made their sausage into patties, and then broke them up into bits for this dish. I’ve changed that process to cook the pork, and then continue on with the rest of the recipe in the same pan.

Date, Cashew, and Coconut Bars

IMG_1550The name says it all…only three ingredients needed to make these delicious Lärabar fake-outs. Having just finished week one of the Whole30 cleanse, I was missing “treats,” meaning bars or cookies, so I went searching for something to scratch that itch. (I know you aren’t supposed to feed your “sugar dragon,” but you are allowed to do snacks for when you’re on the go. So let’s just pretend I’m on the go. A lot.)

I had taste-testers at work and at home try these no-bake bars, giving no explanation other than that they were gluten-free. Everyone who tried them—GF, DF, or not—thought they were really good, and did NOT think they tasted like they were gluten-free. The dates provide both sweetness and glue for the other ingredients, and the nuts and coconuts give them good flavor and crunch. (Since I found this recipe multiple places online, I don’t really know who to give credit to, so pardon me for not citing my source!)

You will need a food processor to mix these, and I don’t think a blender would work as a substitute. These can be pricey ingredients, so I looked around before buying. I found the best price for pitted dates at Costco (if you get your kicks pitting dates, go ahead and do that—I’ve been cooking and chopping my butt off this week, and pitting my own dates would have put me over the edge). I got my raw cashews and unsweetened coconut at Trader Joe’s, as the price was better than Whole Foods or Cub. Next time I purchase ingredients, I’ll take note of the exact prices and figure out how much these cost per bar.

The first time I made these, I used just three ingredients, which worked great. I just made these again, and added the zest and juice of one whole lime, and it helped them stick together better, and made a moister bar. But if you aren’t in the mood for citrus, you can certainly leave that out! Word of warning: you have to keep these refrigerated. They stay chewy if kept cold, and get mushy and fall apart if left at room temp. That’s where packaged Lärabars have these beat—those are more portable.

Makes 12 bars

1 cup whole pitted dates (Medjool or Deglet Noor)
1 cup raw cashews*
1 cup unsweetened flaked or shredded coconut
Zest and juice of one whole lime (optional)

Preheat oven to 375º. Layer the raw cashews on a baking sheet, and toast in oven for 10-15 minutes, stirring once. Toast until golden brown. May sprinkle cashews with salt before toasting. Let cool.

Combine all dates, nuts, and coconut in food processor. Add lime zest and juice, if using. Pulse for a couple minutes, until the ingredients are in bits, and start to stick together. (See below.) Line a baking sheet with parchment paper, and transfer date mixture to pan. Push together to form a ball, then flatten into rough rectangle. Place a layer of plastic wrap on top, then continue pressing into a smoother rectangle, until about ½” thick. (See below.) Chill for 30-60 minutes. Cut into bars, and wrap each bar in plastic wrap. Store in frig to grab as needed.

*NOTE: Why toast the nuts yourself? Because most pre-roasted nuts are cooked in canola oil, and that’s not Whole30 approved. If you’re making these for a nutritious snack and not as part of Whole30 cleanse, then go ahead and purchase the roasted nuts.

IMG_1534

IMG_1535FullSizeRender-1


Jorunn’s Hearty Flatbread

FullSizeRender-3It was worth the trip to Norway, just to have a piece of this awesome flatbread made by my cousin’s wife, Jorunn. She’s a retired home economics teacher, and a fabulous cook, and she came up with this recipe to serve with aged cheese, and smoked salmon or salty herring. It’s great as a side with soup, or works as breakfast when topped with boiled egg slices and cheese. We also fell in love with geitost (also spelled gjeitost, pronounced “yay-toast”) on our visit to Norway—a caramelized semi-hard cheese that is sweet and nutty and almost tastes like dessert. Pictured here is the flatbread served with sliced ham and geitost. Add a dollop of raspberry jam, and it’s a hearty treat done the Norwegian way. Used to be a challenge to find geitost in the U.S., as it was only at Kowalski’s or specialty cheese shops. Now Cub Foods and other grocery stores carry the blocks of Norwegian cheese wrapped in it’s signature red packaging.

It was a bit of a trick to convert Jorunn’s recipe from metric to Imperial measurements (American), but once we figured out the liter to cup conversion, we were able to commit the recipe to paper. This bread is chock-full of flax and oats and sunflower seeds, but no white flour, and is my only whole wheat bread recipe that can claim that. Normally, you need a heaping helping of white flour or else the bread won’t rise. Since this is meant to stay flat and be like a soft cracker, rising is not an issue.

1 cup old-fashioned oatmeal
1 cup salted or unsalted sunflower seeds
½ cup flaxseeds, ground*
½ cup oat bran
1½ teaspoons salt
2½ cups boiling water
1 cup whole wheat flour
¾ cup rye flour
2½ teaspoons yeast
½ cup vegetable oil

In large bowl, combine oatmeal, sunflower seeds, flaxseeds, oat bran, and salt. Stir in boiling water with wooden spoon until all ingredients are moistened. Let stand until mixture is luke warm. Add whole wheat flour, rye flour, yeast, and vegetable oil, and stir until ingredients are incorporated. Set in a sink of warm water, and cover with a clean, damp, kitchen towel. Let rise for 30 minutes.

Preheat oven to 400°. Line large (11″x17″) baking sheet with parchment paper. Spread bread mixture onto lined pan, using a spatula to press dough down into pan. Cover with damp towel again, and let rise another 30 minutes.

Bake in preheated oven for 20-25 minutes, or until brown around edges, and dough begins to pull away from edges slightly. When fresh from oven, cut bread into 20-24 pieces with pizza cutter, and move squares to cooling rack to cool completely. Once cooled, store in container with lid set slightly ajar to keep bread from getting too moist.

NOTE: Flaxseed needs to be ground in order for your system to be able to utilize it’s health benefits. If you buy it whole, you can run small amounts of the seeds through a coffee grinder to get a quick, course grind.

Corn Pudding

IMG_1324A couple cans of corn and some kitchen staples are all that are needed to make this easy corn pudding side dish. We love this with our turkey dinner at Thanksgiving, or with a weeknight meal any time the menu needs a little rounding out. It’s so popular that I made it several times over the last couple months, and there was never anything left to photograph and post! Finally snagged a picture of a bowl, so here it is. I got this gluten-free recipe from a Better Home & Gardens magazine in an article titled “To Grandmother’s House We Go,” with other holiday favorites, before “gluten-free” was a concern. We first tried it some time in the 90’s, and it’s been a guest at our dinner table more often than my goofy Uncle Norman ever since. The only trick is to make sure it’s fully cooked before serving. It’s set when it doesn’t jiggle in the middle when jostled in the oven. I mean the corn pudding, not you. I’m not commenting on whether your middle jiggles when jostled or not.

Serves 8-10

1 (15.25 ounce) can whole kernel corn, drained
1 (14.75 ounce) can cream-style corn
1 cup milk
2 beaten eggs
¼ cup butter, melted
¼ teaspoon course ground black pepper
½ cup cornmeal

Preheat oven to 350°. In a large mixing bowl, combine corn, creamed corn, milk, eggs, butter, and pepper. Add corn meal and stir until moistened. Pour mixture into a 2-quart casserole or 9″x13″ baking dish. Bake in preheated oven for 50 to 55 minutes, or until lightly browned and set in the center. Serve.

No-bake Chocolate, Pretzel, and Peanut Butter Squares

FullSizeRenderIt takes longer to type the name of these salty-sweet treats than it does to make them. My friend Sherie made these for the book club babes last time she hosted, and since she’d used Trader Joe’s gluten-free pretzels, all her GF friends were delighted to have sweets they could eat! Then when I was dying for a wheat-free cookie or a bar last week (that didn’t taste like sawdust), I asked her for her recipe. She’d found it on foodnetwork.com, recipe courtesy of country star Trisha Yearwood. My only adjustment was to use Nestlé’s semi-sweet chocolate chips instead of milk chocolate, as that’s what I keep on hand.

All you need for tools is a big bowl for stirring, and a 9″x13″ pan to chill them in. No oven! All you need for ingredients is butter (of course!), pretzels, confectioner’s sugar, peanut butter, and chocolate chips. I found an 8-ounce bag of Snyder’s gluten-free pretzels at Kowalski’s, but I’m sure there’s a good brand at just about any grocery store. The original recipe didn’t call for GF pretzels, so use whatever kind of pretzels your little heart desires, my Valentine. 

These were so easy! (In fact, your kid’s pet hamster could probably make them, unsupervised.) I thought I was making these treats just for me, but my husband loved them, too. In fact he liked them so much he ate half a pan, all by his lone self in two days time. BOOM! He told me someone broke into the house and ate them. They didn’t touch the TV and computers, but ate my bars. Imagine that! Smart thieves.

Ease rating: Judy easy (anyone can make them!)

Makes 20 bars

1½ sticks (¾ cup) butter, melted
2 cups (8-ounce bag) pretzel rods or sticks, crushed into crumbs*
1½ cups confectioner’s sugar
1¼ cups smooth peanut butter, divided
1½ cups semi-sweet chocolate chips

In large bowl, stir together melted butter, pretzel crumbs, confectioner’s sugar, and 1 cup of the peanut butter. (Recipe calls for smooth, but I only buy chunky, so there are visible peanut bits in my chocolate “frosting.”) Press mixture into the bottom of an ungreased 9″x13″ pan. Combine the chocolate chips and the remaining ¼ cup peanut butter in a microwave-safe bowl or 2-cup measuring cup and microwave on high for 30 seconds. Stir, and microwave for additional 30 seconds. Stir again, until peanut butter and chocolate are smooth and creamy. If needed, heat for another 15 or 30 seconds, until all chocolate chips are melted. Spread over peanut-pretzel layer. Cover and refrigerate for at least one hour before cutting into squares. Do not need to keep refrigerated once chocolate has cooled. Keep covered, and store at room temperature.

*NOTE: Gluten-free pretzels have a unique texture, and do not crumble quite as easily as regular pretzels. You can try crushing them by putting them in a Ziplock bag and using a rolling pin to pulverize, but I found I needed a food processor to crush them into crumbs.

Thai Chicken Stir-Fry with Peanut Sauce and Orange Scented Rice Bowl

FullSizeRender-1The light peanut flavor seems like a strange pairing with the citrus rice in this stir fry, but it’s an odd couple arrangement that works. My son Justin got this recipe from his Senior Foods class, and we often joke that it was the only good thing to come out of his high school experience. (At least there was one thing…) It’s become his signature dish, and when he lived at home, I often asked him to make this to give me the night off from cooking. As there is a lot of chopping involved, it’s good to have a couple people in the kitchen doing prep for this one. And that’s where a younger brother comes in handy—especially when that brother is a whiz at keeping the knives sharp for all that chopping… The fresh grated ginger and bit of heat from the red pepper flakes enhance the sauteed vegetables, and have made this another family favorite.

Makes 4-6 servings

For rice:
3 cups water
1 orange, zested
1½ cups white rice (short or medium grain is best)

For stir-fry:
1 tablespoon vegetable oil
2 boneless, skinless chicken breasts, cubed
1 clove garlic, minced
1 small onion, chopped
½ green (or red) bell pepper, seeded and sliced
2 carrots, peeled and julienned
2 scallions, cut on an angle in 1-inch pieces
½ cup snow pea pods, ends trimmed

For Thai peanut sauce:
3 tablespoons peanut butter
4 tablespoons soy sauce
3 tablespoons honey
1-inch ginger root, peeled and grated (about 1 teaspoon)
1 clove garlic, minced
½-1 teaspoon red pepper flakes (Justin likes 1 heaping tsp. – too much heat for me!)
1 orange, juiced

Topping:
Chopped dry roasted peanuts, optional

Rice: Bring water and orange zest to a boil in medium saucepan. Add rice, return to boiling. Stir once then cover pot and reduce heat to low. Cook until rice is tender, 15 minutes. Fluff with fork.

Stir-Fry: Pour oil in large non-stick skillet with heat on medium-high. Add chicken, garlic, and onion – stir-fry 5 minutes. Add carrot and green pepper, stir-fry 5 minutes; add remaining vegetables and stir-fry 5 minutes more or until chicken is done. Be careful not to allow vegetables to cook until soggy.

Thai Peanut Sauce: In a small saucepan over low heat, mix all sauce ingredients. Simmer until combined. Add sauce to stir-fry and toss. Serve mixture over rice in a bowl.

Hot Mexican-style Spinach Dip

FullSizeRenderWith the Big Game coming up, thought I’d share this recipe for a creamy, hot spinach appetizer that’s a step above the Knorr’s soup and mayo dip we’ve all feasted on. (Remember when it was all the rage to serve that dip in a hollowed out round loaf of bread? That was looooong before Pinterest, so only the hostesses with the mostest were aware of that little trick.) I got this recipe from a friend many moons ago, and dug up the recipe to serve at a recent book club. The ladies loved it, and I promised I’d post it.

Chopped spinach used to only be sold in a solid 10-ounce brick, which takes forever and a day to thaw out. Now you can buy a bag of loose chopped spinach, and that’s usually about 16 ounces. It thaws much quicker, so I made this with the 16-ounce bag for my friends. It was extra spinachy, but no one turned into Popeye. So use whichever package you prefer. (I’ve always thought the spinach squished into a block was kind of strange. What’s the point? Storage issues? So you can teach kids geometry while you cook? Not sure on that one…)

Sometimes I divide this into smaller ramekins, and give each guest their own dish of this delicious dip. Avoids that whole double-dipping faux pas, and no one gets an elbow in the face from an over-eager dipper. It only needs about 20 minutes in the oven if you’re doing smaller individual-size portions.

Serves 6-8

2 tablespoons vegetable oil
1 medium onion, chopped
2-4 fresh tomatoes (about 1½ cups), chopped, and excess liquid drained
2 tablespoons canned chopped jalapeño, or 1 fresh jalapeño, seeds and membranes removed, minced
1 (10-ounce or 16-ounce) package frozen spinach, thawed, and excess moisture squeezed out
2 cup grated Monterey Jack cheese
8-ounce cream cheese, cut into ½-inch pieces, room temperature
1 cup Half and Half cream
2 (2.2 ounce) cans sliced black olives*
1 tablespoon red wine or apple cider vinegar
Salt and pepper to taste

Preheat oven to 400°. Heat oil in medium skillet; saute onions until translucent. Add tomatoes and jalapeño, and cook 2 minutes more. Transfer mixture to a large mixing bowl, and stir in spinach, Monty Jack cheese, cream cheese, Half and Half, olives, and vinegar. Season with salt and pepper to taste.

Spoon mixture into shallow 9″x9″ baking dish and bake uncovered for 30-35 minutes, or until bubbly and browned on top. Serve with tortilla chips.

NOTE: This dip can be prepared ahead, covered, and refrigerated for up to 2 days prior to baking. You will want to let it sit at room temp for an hour or so before baking.

*Also note that the cheap sliced black olives work best in this dish. I made this again for a gathering after initially posting it, and I used Kalamata olives, thinking that would take it over the top into a new realm of tasty goodness. It did not. They made it taste funky. Morale of the story, don’t waste your Kalamata olives in this dip!

Buffalo Chicken Potato Casserole

FullSizeRender-4There’s a great divide in our house, and it’s over this casserole. People either love the creamy Buffalo chicken kick, or they hate it. What’s really weird, is that I’m the one who loves it most, and I’m not much for heat in my food! This recipe was featured on Rachel Ray’s most requested recipes of 2013 show, but I’ve made a few adjustments—like halving the amount of hot sauce, and making more of the béchamel (aka: white sauce). The only ingredients you probably need to grab at the grocery store, are Frank’s hot sauce and a rotisserie chicken. Other than that, it’s basics like potatoes, butter, flour, and cheese. I’ve made it with red potatoes, and russets, and it does seem to work better with the russets for some reason. Use a flour substitute in the sauce, and this dish fills the craving for creamy pasta if you’re doing gluten-free diet.

And where do the famous Buffalo wings get their name? Buffalo, New York, of course, not the 1-ton beast. The story goes that more than 50 years ago, Teressa Bellissimo, owner and cook at the Anchor Bar in Buffalo, New York had gotten a whole crate of chicken wings by mistake, and wasn’t sure what to do with the excess, parts that were usually used only in soups. She came up with the idea to serve them deep friend and bathed in her secret hot sauce, with celery sticks and creamy blue cheese dressing on the side. They were such a hit, that the bar became infamous for her happy accident.

6 tablespoons butter
6 tablespoons all-purpose flour or Namaste gluten-free flour blend
1 teaspoon dry mustard
2½-3 cups milk
1/2 cup of Frank’s Red Hot original cayenne pepper sauce
Salt and pepper to taste
Dash of nutmeg
4 large russet potatoes, peeled and sliced thin (1/8″)
3 cups shredded Monty Jack cheese
1 store-bought rotisserie chicken, skin removed, and meat shredded (approx. 4 cups meat)

Preheat oven to 400°. To make béchamel sauce: In medium sauce pan, melt butter over medium heat. Sprinkle in flour and dry mustard, and stir to combine. Gradually whisk in milk to avoid lumps in sauce (start with 2½ cups and add more milk if sauce needs thinning later). Stir in hot sauce and bring to a boil. Reduce heat to simmer. Season with salt, pepper, and nutmeg. Sauce is thick enough when it coats a spoon when stirred.

In a 9″x13″ baking dish, spoon a thin layer of béchamel sauce on bottom, and layer with 1/3 of the sliced potatoes. Cover with 1/3 of the shredded chicken, 1/3 of the cheese, and 1/3 of the béchamel. Repeat layers twice, finishing with the cheese rather than the béchamel. Cover with foil and bake for 1 hour. Remove foil and bake for an additional 30-45 minutes or until bubbly and golden brown. Let sit for 10-15 minutes before serving.

NOTE: This dish is great left over as well. In fact the flavors mellow, and I actually prefer it second-day.

Wild Rice Soup

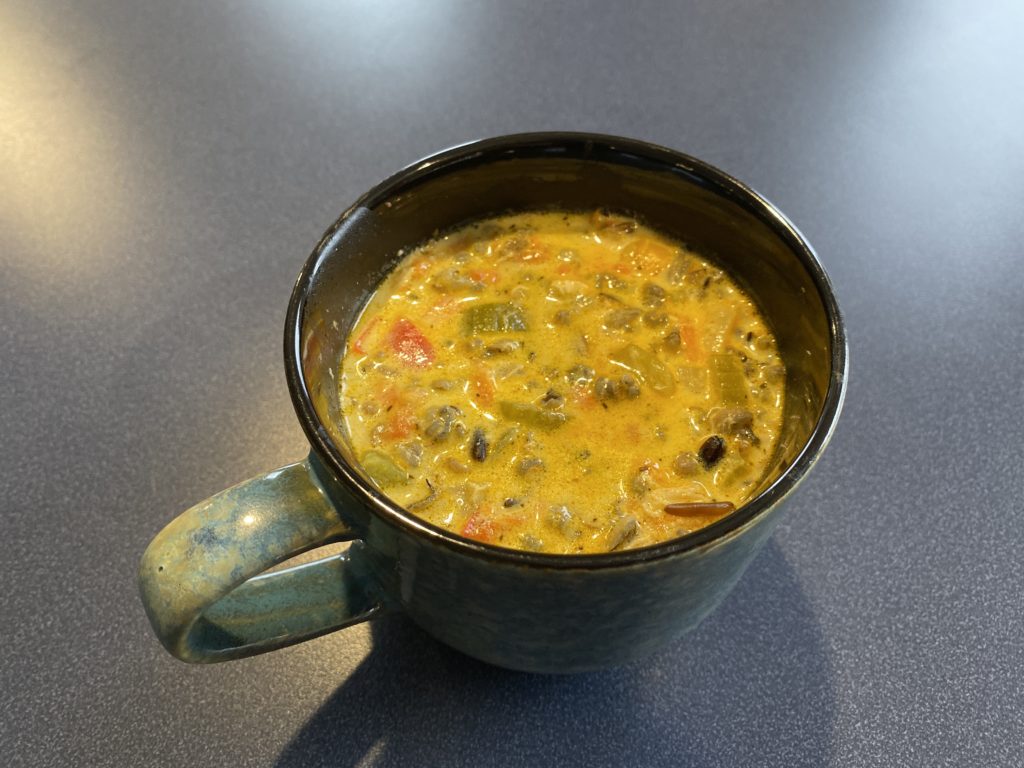
Not-so-great shot of a great-tasting soup!

Minnesotans love their rich and creamy wild rice soup, something unique to the Midwest. So whenever we have out-of-state or overseas visitors, we send them home with a bag of wild rice…and this recipe for making a slightly healthier version of the old standby. I got a recipe similar to this years ago from Lund’s and Byerly’s. The high-end grocery store serves this soup in their deli, and they were handing out the secret recipe in response to frequent requests from patrons. But lately I’ve been adding in a chopped red pepper (which is chock full of vitamin C), and some celery and carrots. I also use only a portion of Half and Half, and then milk to finish it up. It’s still not a low-fat meal, mind you, just a little more substantive. (And I defy you to find another food blog that offers great vocab like “substantive” along with delicious food…)

1 cup wild rice, rinsed and drained
4 cups water
1 cube chicken bouillon
2 tablespoon butter
1 tablespoon minded dry onion
1 medium onion, chopped
1 large sweet red pepper, chopped
4 carrots, peeled and grated
2-3 stalks celery, chopped
¼ cup all-purpose flour or Namaste gluten-free flour blend
4 cups chicken broth
1 cup Half and Half
2 cups skim milk
2 cups shredded rotisserie chicken or 1 cup diced ham, optional

Combine wild rice, water, and bouillon cube in large sauce pan. Cover and bring to a boil. Reduce heat to simmer and cook for 45 minutes, or until majority of kernels are split. Rinse under cold water to shock rice, and halt the cooking process. Set aside.

In large Dutch oven, melt butter. Add dry minced onion and cook until golden. Add chopped onion and cook until onion is translucent. Add pepper, carrots, and celery and cook 5-10 minutes more. Sprinkle flour over vegetables and stir to coat, and then cook a minute more. Gradually pour in chicken broth and stir until no lumps of flour remain. Stir in cooked rice, Half and Half, and 1 cup milk. Add in chicken or ham, if you’d like. Add additional cup of milk if needed to thin soup. Serve.

NOTE: Cream-based soups do not freeze well. Refrigerate your leftovers of this soup.