Zucchini Chips

Veggies = crisp and savory snack. That equation doesn’t always add up with non-vegetable eaters. But try serving up a bowl full of these tasty treats and you’ll win over even the most staunchly adamant vegetable hater.

These were my second new recipe effort with a monster zucchini that had been bestowed upon me. They were best straight out of the oven, and within a few hours of being baked. I brought them to my zucchini gift-giver to try the next day, and they’d absorbed moisture from the air and gone soggy. So if you can bake and eat same day, go for it! (This recipe from allrecipes.com didn’t offer any suggestions for how to make them good Day 2.) I will tell you, you have to bake these to total crispness—any hint of bendability in the chips, and they will start to get soggy as they cool on the racks.

Makes 4 baking sheets of zucchini chips

1 cup low-fat milk
1 cup bread crumbs
1 cup shredded Parmesan cheese, or Kraft grated Parmesan cheese
1 tablespoon garlic powder
1 tablespoon ground black pepper
1 large zucchini, thinly sliced (1/8″ works best)

Preheat oven to 425° Fahrenheit. Line a baking sheet with parchment paper.

Pour milk into a bowl. Combine bread crumbs, Parmesan cheese, garlic powder, and black pepper in a food processor and pulse until combined into fine crumbs. Place zucchini slices in the milk and soak for 1 minute. Remove zucchini slices from milk and press each into the bread crumbs mixture until coated on both sides. Arrange coated zucchini slices on the prepared baking sheets.

Bake 2 sheets at a time in the preheated oven until chips are totally crisp, about 30-40 minutes. Cool on wire racks. Repeat with 2 more sheets of zucchini chips. Best eaten first day.

Zucchini Chocolate Chip Cake

What’s the best way to get your daily dose of vegetables? In a cake, I say! OK, you’re not going to win any “Nutrition Expert of the Year” award by throwing zucchini in a dessert, but you will win people over with this moist, delicious creation. I went on a bit of a zucchini bender last weekend, after my co-worker Nita brought me a gourd the size of a baseball bat (well, half the length, but otherwise the comparison is accurate…). Her mother had pawned the monster off on her, and she brought it to me, rationalizing that a foodie would accept the challenge of how to make use of massive amounts of the veggie. And she was right.

So this was the first of three new recipes I tried in order to use up the behemoth. I found several variations of this on allrecipes.com, and added in the cinnamon and cloves per a reviewer’s comment. How was it? DEE-licious. I will definitely make it again! And my taste-testing co-workers concurred. They all thought these bars/cake were great. No one minded the added fiber in the dessert—it only made it all the more moist and memorable.

Serves 12-16

½ cup milk
1½ teaspoons distilled white vinegar
2½ cups all-purpose flour
¼ cup unsweetened cocoa powder
1 teaspoon baking soda
1 teaspoon cinnamon
½ teaspoon baking powder
¼ teaspoon cloves
½ cup butter, softened
1½ cups white sugar
2 eggs
½ cup vegetable oil
2 teaspoons vanilla extract
2 cups grated zucchini
1 cup chocolate chips

Preheat an oven to 325° Fahrenheit. Grease and flour a 9×13-inch pan. Mix the milk and vinegar in a large bowl. Let stand for 5 minutes to sour the milk.

Combine flour, cocoa powder, baking soda, cinnamon, baking powder, and cloves in a bowl. Set aside. Beat the butter and sugar in a large mixing bowl on medium to high speed. Add in the eggs one at a time, beating well after each addition. Add the vegetable oil and vanilla extract, and beat until combined. Slowly add the flour mixture alternately with the soured milk until all ingredients are combined. Fold in the zucchini. Pour batter into the prepared pan, and sprinkle with chocolate chips.

Bake until a toothpick inserted into the center comes out clean, about 45-50 minutes. Cool on a wire rack. Serve warm or at room temperature. Ice cream or whipped cream topping always a welcome addition, but not required. Cover with foil if serving next day.

Fish Tacos

Smoked fish, sweet nectarines, and savory cabbage slaw make an interesting flavor combo in these fish tacos. The first time I saw “fish tacos” on a menu, I thought it sounded disgusting. Fish? In a taco? Was this an SNL fake commercial or something, like Bass-o-matic? But then a soul braver than me ordered them, and offered me a taste. Ever since then, I’ve been trying to re-create great fish tacos at home. And I think I finally nailed it.

Parts of this recipe came from Bobbie Flay, of Food Network fame. But it’s been twisted and tweaked so it no longer resembles the original, and I can safely claim it as my own. You can certainly grill the fish, but we’re Big Green Egg disciples. My husband prefers to use his BGE smoker any time he can, as it does give meat and fish an amazingly complex flavor. But if a Webber (or other gas grill) is what you’ve got, then go for it! No harm done there.

Makes 8-10 tacos

For Cabbage Slaw
1/3 head of green cabbage, sliced thin and then chopped
6 leaves of Napa cabbage, jullienned
2-3 carrots, grated
1 sweet red pepper, diced
½ of a yellow onion, diced
½ cup diced jicama (optional)
½ cup Hellmann’s mayonnaise
2 teaspoons Penzy’s Northwoods seasoning OR 1 teaspoon sweet paprika, plus dash each salt, pepper, thyme, cracked or powdered rosemary, and garlic powder

Combine all ingredients in large bowl and stir until dressing is incorporated. Set aside or cover and chill until serving tacos.

For Nectarine Salsa
2 ripe nectarines (or peaches)
2 tablespoons minced red onion
Handful or fresh mint leaves, rinsed, and diced

Combine all ingredients in bowl and stir. If not using immediately, cover and refrigerate.

For Fish Tacos
8-10 tilapia (or other mild white fish) fillets
Vegetable oil
Lime juice
Seasonings of choice, such as Penzy’s Foxpoint seasoning (dried shallots and salt), Smoked Spanish Paprika—but even just salt and pepper would be fine.

8-10 purchased corn tortillas

Heat grill to high. Combine oil, lime juice, and seasonings in Ziplock bag and let sit for a few minutes. Place fish in an oiled grill basket or brush grill with oil if placing directly on grill. Grill fish until white and no longer translucent. Break into pieces with fork. Add cooked fish to tortillas with cabbage slaw and nectarine salsa.

Salted Nut Bars

Fans of Pearson’s Salted Nut Rolls will love these easy stove-top bars that taste pretty darn close to the candy bar. In fact, people who are kinda “meh” about the candy bars even love these—like my future daughter-in-law, Ashley, who helped me make a decent dent in a pan of these recently.

As my oven is dying a slow death right now (kind of a problem for a food blogger… Go Fund Me, anyone?), I’m looking for stove top and grill options in our meals and desserts. The recipe for these bars was given to me by my husband’s cousin, Trudy, after she brought them to my mother-in-law’s memorial service, and I begged her for it. Before you berate me for asking for a recipe at such a solemn occasion, you need to know this—My mother-in-law was the original foodie, even though that term wasn’t used in her day. Everything Marynona baked and cooked was delicious, and she served up her great food with a heaping helping of warm hospitality. She would have been touched that a couple of her relatives were bonding over food and sharing recipes at a service being held in her honor. Really.

So back to the recipe! This doesn’t fit with my usual desire to cook with fresh, natural ingredients, and avoid extra sugars. In fact, I think that the butter and peanuts are the only real food ingredients in these, unless you count the sugar that the marshmallows are made of! But when you need a hit of salty and sweet, these do the trick in a snap.

Makes 20 bars

4 tablespoons butter
1 (10-ounce) package Reese’s peanut butter chips
1 (10-ounce) bag miniature marshmallows
1 (14-ounce) can sweetened condensed milk
1 (16-ounce) jar dry roasted peanuts

Butter a 9×13 glass baking dish. Sprinkle half the jar of peanuts in the bottom of the pan. In large pot, melt butter over medium heat. Add peanut butter chips and stir to melt those as well. Add sweetened condensed milk and stir to combine. Add whole bag of marshmallows, and stir until they are coated with peanut butter chip mixture, but do not let marshmallows melt! Gently spoon mixture over peanuts in baking dish, and spread out evenly. Sprinkle the rest of nuts on top and press in with back of large spoon. Refrigerate until firm; cut into squares.

NOTE: Once these are firm from refrigeration, no need to refrigerate again. Trudy had a note on her recipe that says, “these freeze well”, but I’ve never tried that. I’m kind of a “make it and take it” kinda gal—as my family and co-workers will attest. My baked goods don’t usually last long enough to need to be frozen for future consumption.

Green Pepper and Sausage Hash Browns

FullSizeRender-2Sometimes you just gotta keep it simple. Like doctoring up a package of Simply Potatoes plain shredded hash browns with a couple vegetables, and some meat, and calling it a done! My friend Marylee put me onto this brunch or brinner (breakfast for dinner…) side dish, and we love it for a quick after-church-on-Sunday meal with some cheesy scrambled eggs and fruit. You can use half a Kielbasa sausage ring, or a couple links of Andouille—anything will do, as long as it’s meaty and chock full of flavor. Just make sure you grab your biggest skillet or griddle to give the potatoes a chance to brown up nice and crispy. The more surface area, the better!

Serves 4-6

2 tablespoons vegetable oil
1 large yellow onion, chopped
1 green pepper, chopped
1 (20-ounce) package Simply Potatoes shredded hash browns
½ of a Kielbasa sausage ring, chopped into bite-sized pieces

Heat oil on high in large skillet or griddle. Add onion, and cook until translucent. Add green peppers, and sauté and stir for a minute. Add hash browns, let sit to brown for a bit, then use large spatula to flip sections of browned potatoes over, and stir until most of potatoes are golden. Add in sausage, and continue to cook and stir until potatoes are desired crispiness. Serve.

Pizza Pockets

FullSizeRenderCan’t beat the draw of fresh, savory bread, filled with hot pepperoni and gooey melted cheese. Since we’re not Italian, I feel we can’t call these calzones, so they’ve been dubbed “pizza pockets” in our house. And as the definition of a calzone is “an Italian oven-baked folded pizza,” our name works perfectly well. 

It all started with a magazine recipe clipping for “mini French loaves” that sounded more Italian than French in their ingredient listing, and a house full of teenage boys who were bottomless pits. I’d made this dough into buns for dinner, and the guys said, “Hey, this kind of tastes like pizza!” So I decided to make it more like pizza by stuffing it with pepperoni and a mix of cheeses, and then dipping the pizza pockets into purchased marinara sauce. A star was born. (Then I found out that Calzones were a “thing” and I wasn’t the genius I thought I was…oh well. Not the first time!)

I’d not made these for years, and then my son Justin was reminiscing about this dish to his lovely fiancé Ashley. So of course I had to make them for her… She loved them as much as the guys always have, which means she passed the test—welcome to the fam, Ash! 

Now, I have to mention, I’ve tried filling these with a variety of things over the years: sausage and mushroom, green peppers and Canadian bacon and pineapple, etc. But nothing seems to work out as well as the plain old pepperoni and cheese. When something works, sometimes you just have to leave it alone and enjoy the simplicity of it.

Makes 8 pizza pockets

Dough
1¼ cups warm water
2½ teaspoons active dry yeast
2 tablespoons granulated sugar
1 teaspoon garlic salt
1 teaspoon Italian seasoning
½ cup grated Parmesan cheese (Kraft is fine, doesn’t need to be all fancy!)
3 to 3½ cups all-purpose flour

Filling
Package of pepperoni slices
1 cup grated sharp cheddar cheese
1 cup grated mozzarella cheese

For Dipping
Jar of purchased Marinara sauce (My pick is Trader Joe’s as it’s about $1.79 per jar and doesn’t use corn syrupn.)

Dissolve yeast in water in large mixing bowl, letting rise until yeast begins to foam on top. Fit mixer with dough hook. Add sugar, seasonings, 2 cups flour, and Parmesan cheese, and beat until all ingredients are combined. Add flour ½ cup at a time and mix on low setting to form a soft dough. Note that you may not need all of the remaining 1½ cups of flour. Only add flour until dough begins to pull away from the sides of the bowl. Turn dough onto floured surface and knead until smooth and elastic. Grease a clean bowl with shortening, and place dough into bowl, turning once to grease top of dough. Cover with damp kitchen towel and let rise in warm place for about an hour, or until doubled in size.

Grease a baking sheet with olive oil, and sprinkle pan with a light dusting of cornmeal. Punch dough down, and divide into 8 equal-sized pieces. Form each piece into a ball. Roll out into an oval disk using rolling pin. Place about 6 pieces of pepperoni on one half of the disk, in a pyramid of 3 pieces, 2 pieces, and 1 piece. Top with a handful of grated cheeses, then fold empty half of dough over the side filled with pepperoni and cheese. Use the tines of a fork to seal the edges of the dough. Move pizza pocket to greased pan. Repeat with remaining pieces of dough.

Preheat oven to 400° Fahrenheit. Let dough rise in warm place for 30-45 minutes, or until almost doubled in size. (I like to fill my sink with hot water, then top the sink with an oven rack, and place pan on rack. This creates nice humid conditions for rising dough.) Once dough is risen, bake in preheated oven on center rack for 12-15 minutes, or until top of bread is light golden brown. Remove to cooling rack for about 10 minutes before serving. Heat marinara sauce in saucepan for a few minutes. Serve pizza pockets with a small ramekin of Marinara sauce for dipping as you eat.

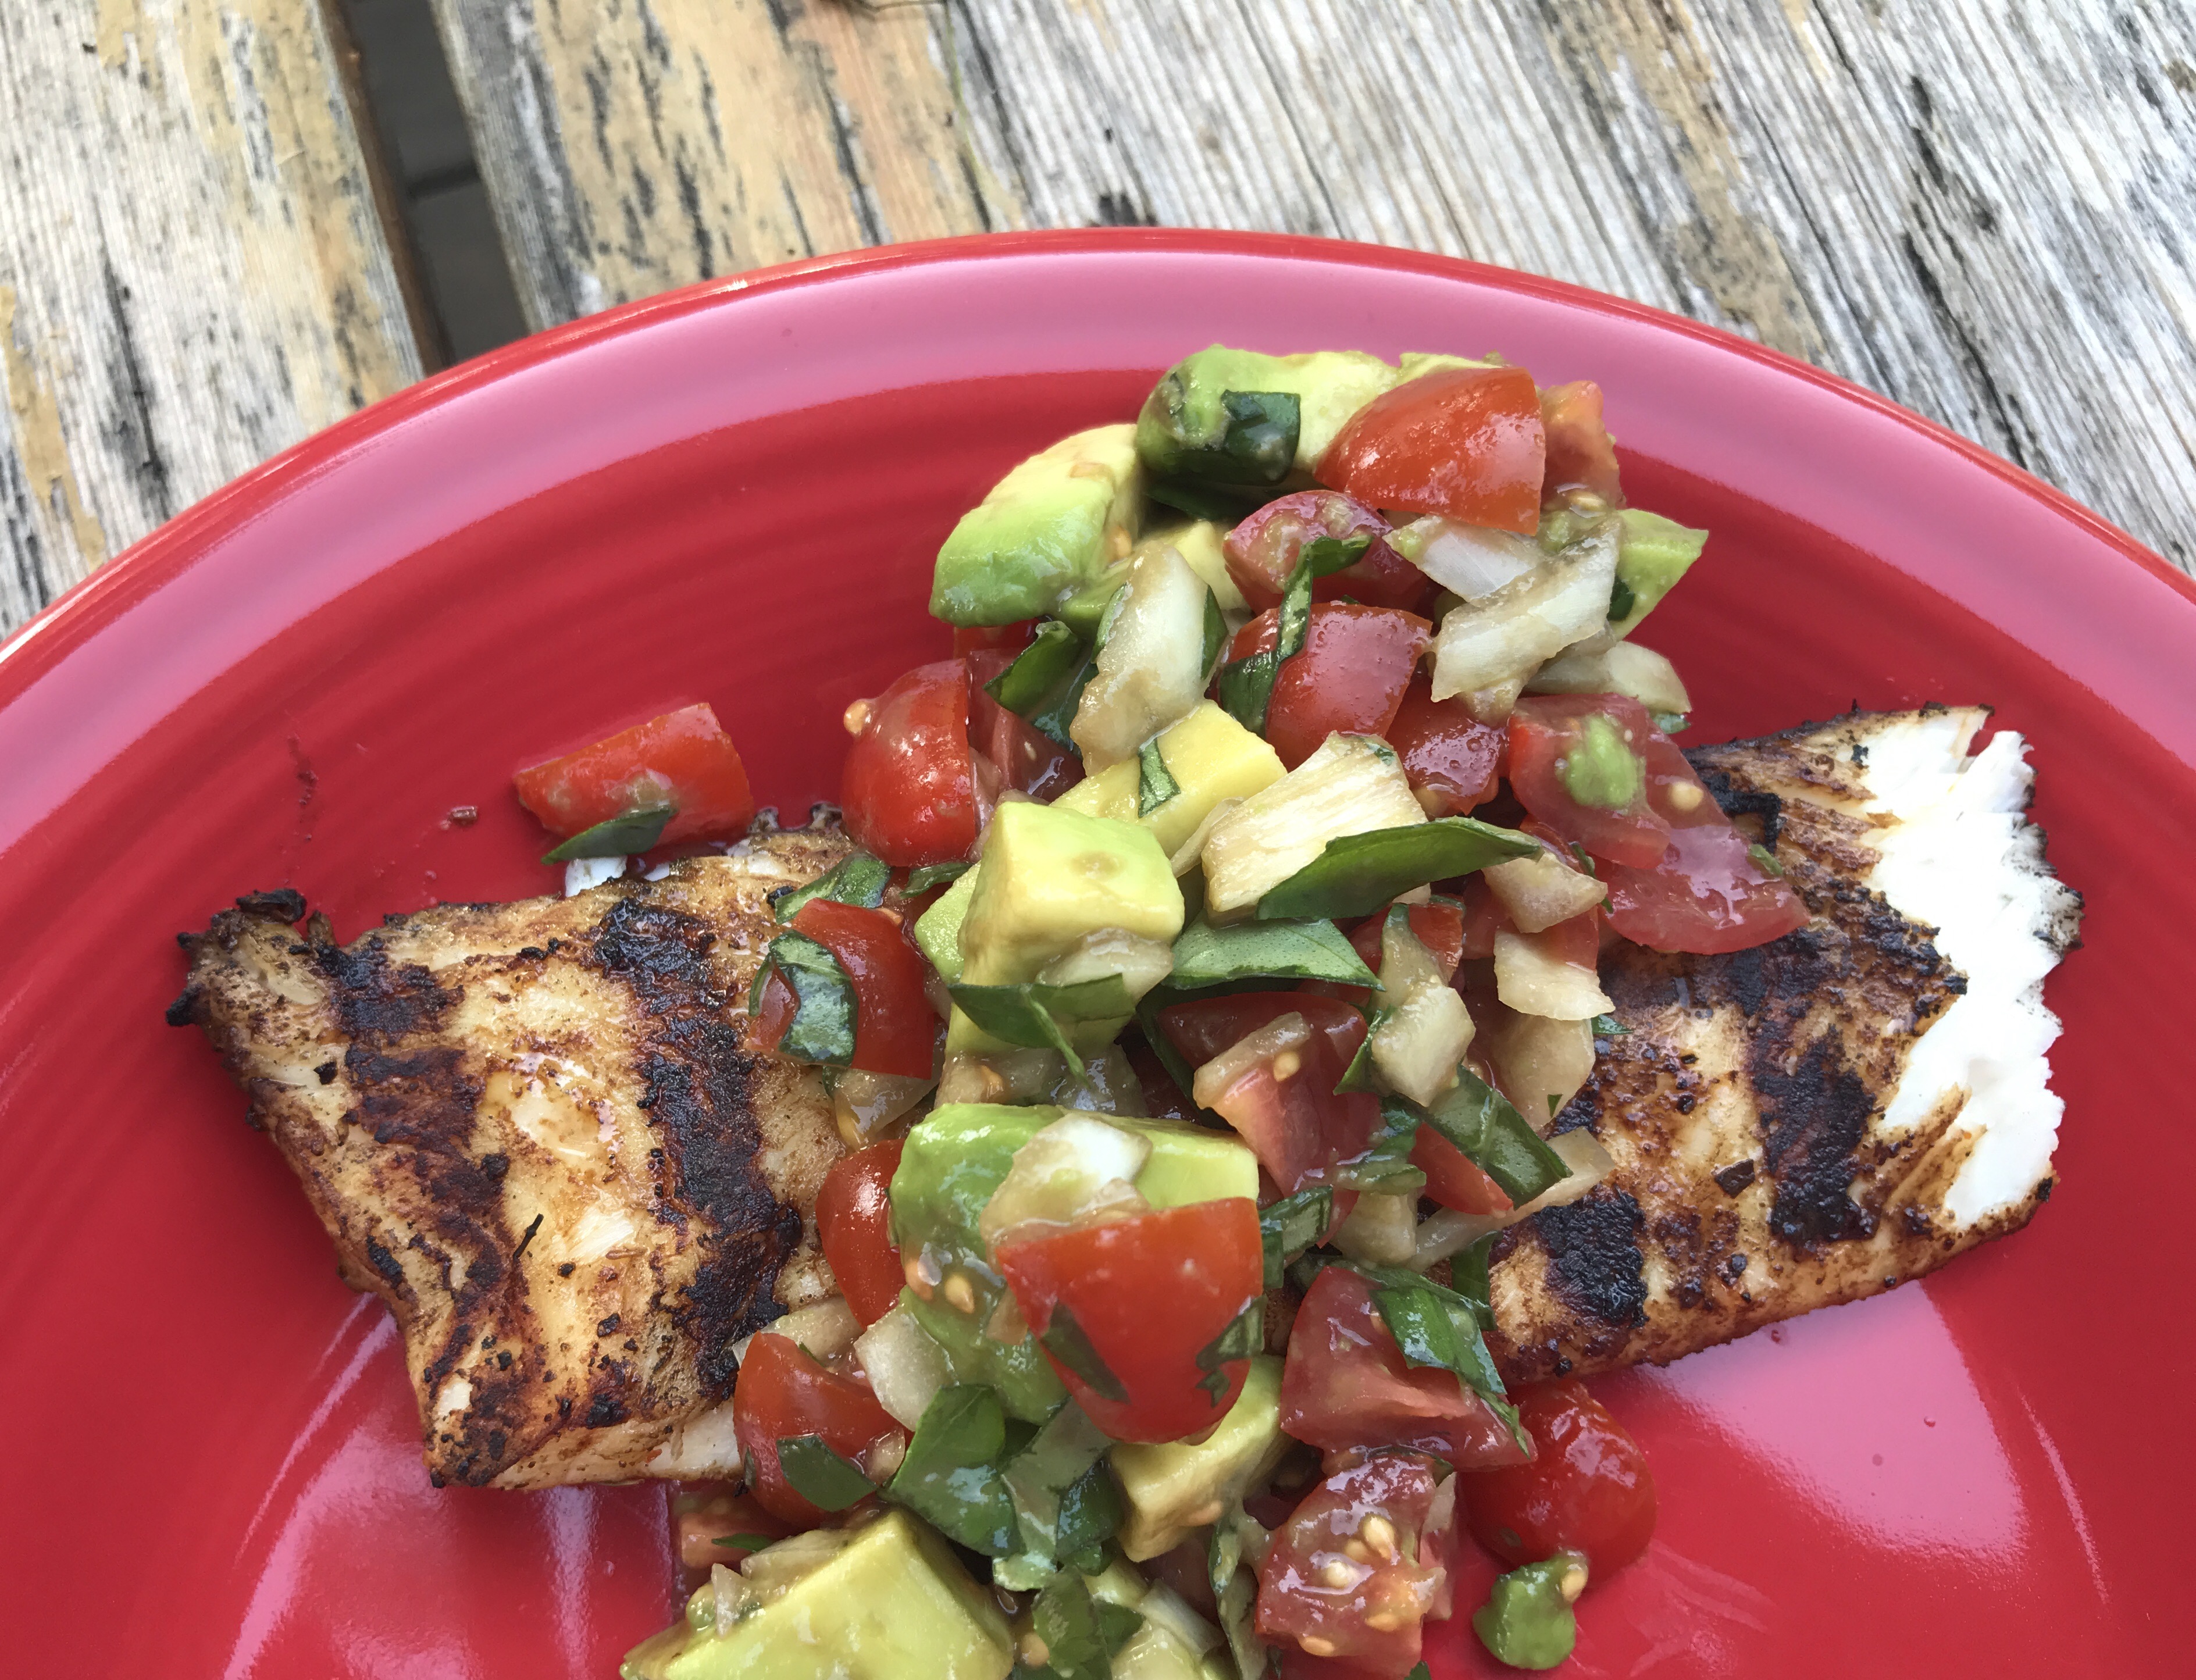
Fresh Tomato Avocado Salsa

Need a quick topping for grilled fish or chicken? Try chopping up a few fresh veggies like this, drizzling them with balsamic vinaigrette and TA-DAAAH!!! You’ve just taken your dinner up a notch in flavor. I grabbed these ingredients thinking they’d pair well with my husband’s grilled tilapia the other night, and boy, did they ever. We gave it a solid 10 out of 10! So simple, there’s really nothing more to say—let’s just get to the recipe, if you can even call it that…

Makes 4-6 servings

1 cup grape tomatoes, halved and quartered
1 ripe avocado, chopped
2 slices yellow onion, diced
A few sprigs of fresh basil, chiffonade*
A splash of balsamic vinaigrette

Combine all ingredients in a bowl, stir, and ladle on top of cooked fish or chicken.

*NOTE: Chiffonade is the technique of bunching up herb leaves and chopping into fine, thin strips.

Green Tea Pound Cake

This moist cake tastes like pound cake, but there’s not a trace of butter used in the batter. The surprising green hue comes from matcha green tea powder, which has very little flavor component to it—at least the powder I used wasn’t terribly potent. And why was I testing a cake recipe using green tea powder? Here’s the back story. 
Hosting students from other countries has expanded our culinary tastes, encouraging us to try all sorts of unique foods. We’ve grown especially close to one of our students, Kana Miyamoto, from Japan. She loved that she got to stay in the home of a foodie, and we loved that she was game to try everything we offered her! After her last visit, she sent me a box full of food-related items unique to Japan. I’ll need a translator to figure out what some of the packets are… But there was a bag of matcha green tea powder that had some English on it, so I searched online to find something to do with it. A cake similar to this is posted on several sites, so I’m not sure of the recipe’s origin. 
As for “selling” this recipe, don’t know quite what to say. My co-workers said “it tastes like pound cake” as they gobbled it up. I offered it with Reddi-Wip® as a topping, because, well, whipped cream makes everything better. It was good, and I’ll make it again, maybe increasing the amount of matcha. As I said earlier, the green tea powder didn’t have much flavor, and my cake wasn’t as green as others pictured online. Given that it uses olive oil and Greek yogurt, it’s a slightly healthier version of the traditional pound cake.* Slightly. So play the “it’s good for you” card when you serve this to guests. That always works, right?
2 cups all-purpose flour
¼ cup matcha green tea powder
2 teaspoons baking powder
½ teaspoons salt
1 cup Greek yogurt
cups sugar
3 eggs (room temperature)
½ cups olive oil (either regular or extra virgin)
1 teaspoon vanilla extract
½-1 teaspoon almond extract (depending on how much almond flavor you want!)
Powdered sugar for dusting cake
Preheat oven to 350° Fahrenheit. Prepare a 10-cup Bundt pan by spraying it with Pam, or greasing and flouring the pan. In medium bowl, combine the flour, matcha powder, baking powder, and salt. Set aside. In a large mixing bowl, combine yogurt and sugar until blended. Add the eggs one at a time, beating after each addition. Add the olive oil and vanilla, and combine. Gradually add in the flour mixture until blended. Add the remaining flour and fold just until combined. Don’t overmix.
Pour batter into prepared Bundt pan. Bake for 40-45 minutes until a wooden skewer inserted into the center comes out clean. Remove from oven and place on a wire rack. Let sit for 15 minutes and then invert onto serving plate and let sit until completely cool. Sift powder sugar on top of the cake and enjoy!
*NOTE: I’ve read that pound cake got it’s name because it originally used a pound each of butter, eggs, flour, and sugar.

Mexicali Pie

This nummy Mexican-inspired casserole is one of my quick dinner go-to recipes for busy weeknights. We love the spice mix, and that it’s meat, a few veggies, and corn bread all in one meal. But we especially love that it’s great left over, and it travels well in a container, even when in Mitchell’s back pack, jostling around as he rides his bike miles and miles to work. Not every dish can pass THAT test. (Incidentally, my crazy son is riding his bike year-round—even in the January snow and ice of MinneSNOWtah.)

This recipe was published some time in 2003 in Family Fun, by Ken Haedrich, a contributing editor to that magazine at the time. He gave a list of spices to mix in, but I use Penzey’s chicken taco seasoning mix to make it easy on myself. I’ll give you the author’s spice mix below, in case you don’t do Penzey’s. (Which is easy to order online, so you totally can…) Note that the recipe called for ground beef, but I make it with either ground beef or ground turkey—both taste great.

I used to make a hot cheddar cheese sauce to ladle on top, but lately I’ve liked the fresher taste of an avocado, Greek yogurt, and some cilantro instead. The cheese sauce is great for comfort food in the winter time, but leads to that dreaded need for an afternoon nap. You know, the food coma. Since work-naps are frowned upon at my place of employment, it’s best to keep with the lighter toppings when bringing this for lunch.

Serves 8-10

Casserole
1½ pound ground beef or turkey
1 medium yellow onion, chopped
1 green pepper, chopped
2 cloves garlic, minced
3 tablespoons Penzey’s chicken taco seasoning mix *
2 cups frozen corn, thawed, or 1 (15-ounce) can of corn, drained
2 (14.5 ounce) cans Mexican or chili-style diced tomatoes, or regular diced tomatoes

Corn Bread Topping
1 cup yellow cornmeal
½ cup all-purpose flour
1½ tablespoons granulated sugar
2 teaspoons baking powder
¼ teaspoon salt
1 egg
1 cup milk
¼ cup vegetable oil

Toppings
Diced avocado
Greek yogurt, or sour cream
Cherry tomatoes, halved
Shredded sharp cheddar cheese
Chopped fresh cilantro

Preheat oven to 400° Fahrenheit. Brown ground beef or turkey in a large non-stick skillet, breaking up as it browns. Use a slotted spoon to transfer all the meat to a mixing bowl. Drain all but about 3 tablespoons fat from pan. Put pan on medium-high heat and sauté onions until translucent. Add green pepper and cook for 2-3 minutes. Add the minced garlic and the taco seasoning, and stir and toast spices until fragrant. Stir in corn and tomatoes. Bring mixture to a boil, cover pan, and reduce heat to low. Return meat to the pan and stir to combine.

Ladle meat mixture into a 9″x12″, 3-quart casserole dish, then make cornbread topping. In mixing bowl, combine cornmeal, flour, sugar, baking powder, and salt. Whisk egg, milk, and oil in separate bowl. Add milk mixture to dry ingredients and mix on low until blended. Pour batter over the meat mixture and even out with the back of a spoon. Bake for 22 minutes or until topping is golden brown, and toothpick inserted in center comes out clean. Serve with suggested cold toppings.

MAKE AHEAD TIP: You can make the meat mixture, put it in the casserole dish, and cover with foil or plastic wrap and refrigerate. Then pull it out and just mix up the corn bread topping, pour it on, and bake.

*If not using Penzey’s taco seasoning, use:
2 teaspoons chili powder
1½ teaspoons cumin
1 teaspoon ground coriander
½ teaspoon salt
¼ teaspoon cayenne
1 tablespoon flour

Strawberry Rhubarb Oat Bars

The sweet-tart combo of strawberries and rhubarb is to die for, in my humble opinion. And since my rhubarb is threatening to take over the world this spring, I’m trying to find new and creative ways to use it up. When I saw a recipe on Better Homes & Garden’s website for bars using my favorite fruit duo, I said, “I’m in!” Then once I started perusing the recipe, I realized 1) the pan/batch was waaaaaaay too small to serve my family or co-workers, and 2) it looked strikingly similar to my blueberry breakfast bars previously posted! (Which DOES make a large enough batch to serve my family or co-workers…)

So I kinda combined my blueberry bar recipe with the BH&G recipe, and I think we’ve got us a winner here, people! Rhubarb is a little more finicky fruit than the berries, though. So it took a little trial and error to get it simmered the right length of time, and make sure the sugar ratio was on point. Now I’ve done all the heavy lifting for you. All you have to do is bake up a batch!

Makes 15 bars

2 cups old-fashioned rolled oats
1½ cups all-purpose flour*
¾ cup firmly-packed dark brown sugar
½ teaspoon baking soda
½ teaspoon cinnamon
¼ teaspoon salt
¾ cup butter, melted
3 cups chopped rhubarb
1 cup granulated sugar
¼ cup water
½ teaspoon ground ginger
3 cups sliced fresh strawberries
1 tablespoon cornstarch
1 tablespoon water

Preheat oven to 350° Fahrenheit. Grease an 11″x17″ pan with butter and set aside. In large bowl, combine oats, flour, brown sugar, baking soda, cinnamon, and salt. Stir to combine. Add melted butter and stir until all of oat mixture is combined with butter. Reserve 1 cup of the mixture and set aside. Press remaining oat mixture in bottom of prepared baking dish. Bake for 10 minutes. Remove from oven.

While crust is baking, combine rhubarb, granulated sugar, water, and ginger in large saucepan and heat on high. Once mixture starts to boil, turn to medium and simmer for 8-10 minutes, stirring occasionally. Rhubarb should start breaking up, and it should thicken up. Add strawberries and return heat to high. Once it starts to boil again, turn down to medium and simmer for 3-5 minutes. In small bowl or cup, combine cornstarch and water. Drizzle in to rhubarb and strawberries and stir until mixture thickens up a bit. Pour on top of baked crust and sprinkle with reserved oat crumbs. Bake for additional 30** minutes. Let cool completely before cutting into bars.

*NOTE: I’ve started using Costco’s Ultragrain flour, which is a non-GMO flour and may be tolerable to those who are sensitive to gluten. But it’s not for those with celiac disease!

**Next time I make these, I may try baking these 40 minutes once crust is topped with fruit. Rhubarb seems to require a longer baking time than berries, peaches, pears, etc. I was concerned about the top burning if I did them longer than 30 minutes, but I think they would have been fine.