Tabbouleh

IMG_0959With my fresh mini herb garden pots going wild, I’ve been looking for ways to use the abundance of mint threatening to take over the deck. The Good Earth restaurant makes a fabulous tabbouleh, and after ordering it recently, I thought it looked easy enough to duplicate at home. I tried Ina Garten’s recipe found on foodnetwork.com, and I liked her process, but found the recipe had too little bulghur in ratio to the herbs and tomatoes, too much pepper, waaaaaaay too much salt (even with using only 2 1/2 teaspoons table salt instead of the kosher salt she recommended*), and far too many scallions. Then I looked at Ellie Krieger’s recipe, and ended up using my own amounts based on the two recipes. Ina puts the dressing into the bulghur wheat while it’s soaking, and Ellie pours in on after the fact. I tried it Ina’s way, and it seemed to have great flavor, with my adjustments to amounts below. I’m sure it would work fine to add the dressing after soaking the wheat, too.

I know this traditional Lebanese dish usually has more herbs and less bulghur than you see here, but we preferred a little more of the ancient grain to temper all the mint and parsley. And my son Justin said that 1 cup mint was over-the-top, and I needed to back off a bit. I liked it, but I love mint so much I want to marry it, so take that into consideration.

This is a versatile dish. It can be served as an appetizer along with toasted pita triangles and spicy hummus, and some sliced cucumbers, tomatoes, and Kalamata olives. Or it can be a salad or side to a meal. Shred or cube some grilled chicken into the bowl, and it’s a meal. The ease of the dish, plus the fresh herbs, make it perfect for warm weather, no matter which part it plays in your meal.

*NOTE: I did some research on kosher salt/sea salt/table salt, and found that you need more kosher or sea salt than table salt if substituting one for the other in a recipe. See this handy conversion chart for your own reference.

Serves 6-8

1 1/2 cups bulghur wheat
2 1/4 cups boiling water
1/4 cup freshly squeezed lemon juice (2 lemons)
1/4 cup good olive oil
1 teaspoon lemon zest
1 teaspoon salt
1/2–1 cup chopped fresh mint leaves (1 bunch)
1 cup chopped flat-leaf parsley (1 bunch)
1 hothouse cucumber, unpeeled, seeded, and medium-diced
2 cups cherry tomatoes, cut in half
2–3 tablespoons mined red onion
2–3 tablespoons chopped fresh chives
1/2 teaspoon freshly ground black pepper

Place the bulghur in a large bowl, pour in the boiling water, and add the lemon juice, olive oil, salt and lemon zest. Stir, then allow to stand at room temperature for about 1 hour. (You can also just pour the boiling water over the bulghur, and add the dressing ingredients later.)

Add the mint, parsley, cucumber, tomatoes, red onion, chives, and the pepper; mix well. Season with salt, if necessary; cover and refrigerate. Flavor improves if the tabbouleh is made a few hours ahead of serving time.

Oatmeal Carmelitas

FullSizeRenderOats and caramel and chocolate—oh my! This recipe was entered in the Pillsbury Bake-Off by Minnesotan Erlyce Larson in 1967, and won hands down. One bite of these gooey taste treats, and you’ll agree whole-heartedly with the judges decision. My friend Lois brought these to a gathering at our house, and they were the hit of the dessert table. (I consumed more than my fair share, so that’s why there are so few left on the plate in the photo. Sadly, this image doesn’t do them justice.) My mother makes a similar Caramel Candy Bar (posted a few weeks ago). Mom’s recipe is to die for, but her recipe requires laboriously unwrapping dozens of caramel candies to make the luscious middle layer, while this recipe uses a short-cut—a jar of caramel ice cream topping. Next time you’re planning a party, invite Lois. And ask her to bring these heavenly bars. Mmmmmm.

Crust

2 cups all-purpose or unbleached flour
2 cups old-fashioned oatmeal
1 1/2 cups firmly packed brown sugar
1 teaspoon baking soda
1/2 teaspoon salt
1 1/4 cups margarine or butter, softened

Filling

1 (12.5 ounce) jar (1 cup) caramel ice cream topping
3 tablespoons all-purpose or unbleached flour
1 cup semisweet chocolate chips
1/2 cup chopped pecans or walnuts

Heat oven to 350° Fahrenheit. Grease 13″ x 9″ pan. In large bowl, combine all crust ingredients; mix at low speed until crumbly. Reserve half of crumb mixture (about 3 cups) for topping. Press remaining crumb mixture in bottom of greased pan. Bake in preheated oven for 10 minutes.

Meanwhile, in small bowl, combine caramel topping and 3 tablespoons flour; blend well.

Remove partially baked crust from oven; sprinkle with chocolate chips and nuts. Drizzle evenly with caramel mixture; sprinkle with reserved crumb mixture. Return to oven; bake an additional 18 to 22 minutes or until golden brown. Cool 1 hour or until completely cooled. Refrigerate 1 to 2 hours or until filling is set. Cut into bars.

Crunchy Cauliflower and Pea Salad

IMG_0963Trying to get kids—or picky adults—to eat their veggies? This crunchy salad loaded with fresh cauliflower, celery, and peas might just convert some veggie-haters into lovers. Ranch is the base of the dressing, and then there’s bacon…so I rest my case. I think I got this super easy recipe from a women’s magazine ad promoting Ranch dressing, from when Ranch was new player on the food scene (80’s or 90’s?). I will say that the cashews are delicious in the salad, but if you’re not going to consume the whole bowl in one sitting, they soften and take on the texture of mushrooms by the next day. So only add the cashews to the amount of salad you think will be eaten first time around. Otherwise, the salad is fine leftover the next day!

This is a nice year-round recipe, as the ingredients are available any time. It’s especially good with spring and summer menus, as a side to grilled meat, burgers, or brats, and even better if you’re bored with beans and slaw. And as excited as we Midwesterners are about summer when the first blades of green grass appear, we do get to that point. Am I right, people?

Serves 6-8

10 ounces fresh shelled peas, or frozen
2-3 cups fresh cauliflower florets, in bite-size pieces
1 cup diced celery
1 sweet red pepper, diced
1/4 cup diced scallions
6-8 slices crisply cooked bacon, crumbled
1 cup cashew halves

For dressing

1 cup Ranch dressing
1/2 cup sour cream
1/2 teaspoon Dijon mustard
1 clove fresh garlic, minced

If using frozen peas, rinse in cold water in strainer, and allow to drain. In large bowl, combine cauliflower, celery, red pepper, and scallions. Once peas are drained, add those as well.

In medium bowl, combine Ranch dressing, sour cream, Dijon, and garlic. Beat with wire whisk until dressing and sour cream are smooth. Pour over vegetables, and toss to combines. Add crumbled bacon and toss again. Add cashews just before serving.

NOTE: If using a gluten-free Ranch option, this recipe is gluten-free. Leave out nuts if you’ve got nut-allergy folks in your circles, and it tastes just fine without them. The bacon gives it enough flavor so you won’t really miss the cashews. The bacon also removes it from the vegetarian dish category…sorry.

Hardware Choker

IMG_0945This choker is another boredom-buster for the men in your life. Little men, that is… My sister Judy is teaching summer school to a bunch of 8-year-old boys. Since her elementary ed training is in music and special ed, she asked me for some craft ideas for Fridays as a reward for the poor little guys having to suffer through school in the summer. (Having raised 3 boys, I’ve got a few guy-friendly project ideas in my arsenal, and am having fun digging through files and tripping down memory lane.) Last week the fellas had a blast making Slime, and this week they’ll be doing these cool hardware chokers. I’ll post 2 more projects in the weeks to come.

You may already have the supplies to make these on hand, and if not, you’ll find most of what you need at Walmart and your hardware store for a couple bucks. (I had to hit Jo-Ann’s as well for the lanyard hooks. They didn’t have them at the Walmart near me.) These are just suggestions to get you started—you may have other choker-worthy supplies in your tool chest. The nice thing is, you can do this without firing up the glue gun, or messing with paint. And your little dude will be sportin’ a new accessory come time for school in the fall.

IMG_0938

Suggested supplies

3/8″-16 zinc plated hex nuts (stainless steel are nicer, but more expensive)
1/4″-20 zinc plated hex nuts
1/8″ x 3/4″ zinc plated washers
Lanyard hook
Jump ring
2 pony beads (not pictured in supply photo)
30 inches of Leather lacing

Have kids lay nuts, washers, etc. out in a pattern. Symmetrical patterns will look best in the finished choker, with biggest pieces in the center. String the main middle pieces onto leather lacing and move to center. Tie knots on either side of grouping to hold in place. Leave a little space and tie knots on either side of main section. String more nuts and washers on either side, and tie knots to hold in place. String a pony bead through each of end of choker, and then string a lanyard hook through on one side, and a jump ring through on the other side. Double back with the leather lacing, pushing the ends through pony beads to secure the clasps that have been created with lanyard, jump ring, and pony beads. Adjust lacing as needed so choker is correct length. (You can add a drop of hot glue or Aleene’s Tacky glue to the leather under the pony bead for extra secure finishing.) Cut off excess leather lacing. Choker is ready for wearing!

IMG_0939IMG_0942IMG_0943

IMG_0946

Thai Peanut Pasta Salad

FullSizeRenderPeanut allergy people and gluten intolerant folks, you might as well skip reading this post right now. My apologies in advance. But if you’re a fan of Thai dishes heavy on peanut, you’ll love this easy pasta recipe that can be eaten warm or cold. The recipe was requested by a Pioneer Press reader when I wrote the “In the Kitchen” column for that paper several years ago. It was served at the Marshall Field’s deli at the time (and might still be offered at Macy’s deli…), and executive chef Tim Tesch was happy to pass it along. After making it several times, I’ve made some adjustments—I’ve increased the peanut butter and sugar amounts, decreased the soy sauce, and added in some fresh garlic for additional flavor. 

The chicken can be grilled or fried in a pan, if making the dish during non-grilling season. (It’s never non-grilling season at our house. My husband grills year-round.) We like eating this while still warm for dinner, and then chilling the leftovers for lunches the next day. It’s great at either temperature. I suppose it’s the chilling of the pasta that gives it the “salad” name tag? Don’t let the title fool you—it really is a whole meal. Since it’s easy to make ahead of time, it’s great potluck fare, if you’re feeling generous enough to share with others. But you may just want to keep it all for yourselves. I’m OK with that.

Serves 4 to 6

1 pound chicken breast or tenderloin
Dash each of soy sauce, vegetable oil, and garlic salt
1 cup fresh or frozen peas (optional)
1/3 cup shredded carrots
4 scallions, sliced thin
2 tablespoons sesame seeds, toasted (in 375° oven for 10 minutes)
1/2 pound uncooked spaghetti pasta

For sauce

1/4 cup vegetable oil
2 cloves garlic, minced
1/4 to 1/2 cup peanut butter (I use 1/2 cup)
1/4 cup soy sauce
2 tablespoons white vinegar
2 tablespoons to 1/4 cup sugar (I use 1/4 cup)
Dash crushed red pepper flakes

1/3 cup dry roasted peanuts, chopped, for garnish

Toss chicken in dash each of soy sauce, vegetable oil, and garlic salt; grill or fry until chicken is no longer pink in center. Once cooled slightly, julienne or chop chicken. If using frozen peas, rinse them in cold water and let drain until thawed. In large mixing bowl, combine cooked chicken, peas, carrots, scallions, and sesame seeds. Set aside.

Bring water to a boil and break pasta into halves or thirds and cook according to package directions; drain. While pasta is cooking, make sauce. Pour oil into large sauce pan. Heat oil on medium, and add minced garlic. Cook until garlic turns golden brown. Add peanut butter, soy sauce, vinegar, sugar, and red pepper flakes. Continue to cook and stir on medium heat until all ingredients are incorporated, and sauce is smooth. May need to add 2 tablespoons to 1/4 cup water at this point to thin sauce to desired consistency. Pour sauce into bowl with chicken and vegetable mixture, and add cooked pasta. Using tongs or large wooden spoon, toss all ingredients around until sauce coats evenly. Serve warm with chopped peanut garnish, or chill to serve later. (Garnish with peanuts at time of serving.)

Raspberry-Rhubarb Slab Pie

FullSizeRenderWhen my rhubarb plant got beaten up in a fierce summer storm, I needed to get creative in the kitchen and use it or lose it. Browsing online, I came across this raspberry and rhubarb dessert (from tasteofhome.com) that sounded like a fun departure from my usual go-to rhubarb recipes. Plus, I’ve never made a pie crust—unless we did a pastry session in 7th grade foods class. Who can remember? At any rate, I thought I should get outside my baked-goods comfort zone and challenge myself a little.

Whoever coined the phrase “easy as pie” was on drugs. What’s so “easy” about PIE??? I followed the instructions for making the pastry, and got ready to roll out the dough. The directions were to roll it out between layers of waxed paper, but it was too flimsy and the dough was slipping all over the counter and the flour was flying. So I switched to floured parchment paper, and that worked a little better, but it was still no picnic. (That’s another expression I don’t get… Doesn’t making a full meal to bring on a picnic rank up there in culinary challenges? I find it exhausting.)

The next hurdle was trying to get the dough evenly distributed—equal thickness, and sorta in a rectangular shape. After 3 hours (or so it seemed) of huffing and puffing, I did finally get the bottom piece rolled and ready for the fruit filling. But then I had to do it again for the top! Ugh. I just about stabbed myself with the rolling pin. The end result was quite tasty, but I don’t think I’ll be winning any ribbons at the Fair in my lifetime.

On a scale of 1 to 10, I’d give it an 8. I loved the sweet-tart combination of the raspberry and rhubarb, and it was a nice change of pace from strawberry-rhubarb. It would be a fabulous treat to bring to a potluck, as it serves two dozen. I also liked that it was slimmer than a piece of pie, and the crust to fruit-filling ratio was perfect. Had my crust not been so tough, it would have been a perfect dessert. Next time, I’ll buy the Pillsbury refrigerated pie crusts* and save my sanity.

Makes 18-24 servings

3 1/4 cups all-purpose flour
1 teaspoon salt
1 cup butter
3/4 cup plus 1 to 2 tablespoons 2% milk
1 egg yolk
2 cups sugar
1/3 cup cornstarch
5 cups fresh or frozen unsweetened raspberries, thawed and drained
3 cups sliced fresh or frozen rhubarb, thawed and drained

VANILLA ICING

1 1/4 cups confectioners’ sugar
1/2 teaspoon vanilla extract
5 to 6 teaspoons 2% milk

 In a large bowl, combine flour and salt; cut in butter until crumbly. Whisk 3/4 cup milk and the egg yolk; gradually add to flour mixture, tossing with a fork until dough forms a ball. Add additional milk, 1 tablespoon at a time, if necessary. Divide dough into two portions so that one is slightly larger than the other. Wrap each in plastic wrap and refrigerate 1 hour or until easy to handle.

Preheat oven to 375° Fahrenheit. Roll out larger portion of dough between two large sheets of lightly floured parchment paper into an 18″x13″ rectangle. Transfer to an ungreased 15″x10″x1″ baking pan. Press onto the bottom and up sides of pan. Trim pastry to edges of pan.

In a large mixing bowl, combine sugar and cornstarch. Add raspberries and rhubarb, tossing to coat. Spoon into pastry. Roll out remaining dough and place over filling. Fold bottom pastry over edge of top pastry; seal with a fork. Prick top with a fork.

Bake 45-55 minutes or until golden brown. Cool completely on a wire rack.

For icing, combine confectioners’ sugar, vanilla and enough milk to achieve a drizzling consistency; drizzle over pie. Cut pie into squares. Serve warm or room temperature with ice cream.

NOTE: If using frozen rhubarb, measure rhubarb while still frozen, then thaw completely. Drain in a colander, but do not press liquid out.

* Pillsbury also makes a gluten-free refrigerated pie crust option.

Spicy Hummus

IMG_0899We used to think Trader Joe’s hummus was da bomb, until we tried this recipe from Rachel Ray’s website. Now we mix up our own fresh hummus whenever we have a hankering for a dip to use with pretzel flats, pita chips, or cukes, carrots, and pea pods. This is also great on fajitas, and it keeps in the frig a couple weeks, so no need to make it when you’ve got a bunch of other stuff to chop and saute. (Note: You will need a food processor or blender to get the desired smooth consistency.) I’ve tweaked the recipe each time I’ve tried it, and those changes are reflected below. Turns out tahini (a sesame seed paste found in either with the olives, or in the ethnic food aisles) is the secret ingredient that gives hummus it’s creamy texture and slightly nutty taste.

(Hey Judy! Here’s another recipe that uses the coriander you bought to make the Savory Sweet Potato Biscuits.)

Makes 6-8 servings

1 (14.5-ounce can) garbanzo beans, rinsed and drained (also called chickpeas)
2 rounded tablespoons tahini paste
1/4 cup olive oil
1 lemon, juiced
1 clove garlic, peeled and chopped
1 teaspoon ground cumin
1 teaspoon coriander
1/2 teaspoon crushed red pepper flakes
Course salt to taste

Combine all ingredients in food processor bowl and pulse until mixture is smooth and creamy. Transfer to small bowl and serve with pita chips or veggies. Or store in airtight container in frig for 2-3 weeks.

Slime

FullSizeRenderAnyone heard “I’m boooooorrrrr-ed!” from a kid this summer? Here’s an activity that’ll keep kids occupied for hours on end. You can buy Gak (Nickelodeon’s name for it) at Toys “R” Us, but making your own Slime or goop—or whatever you want to call it—is way more fun. What magic powder turns simple glue into goo? Borax. It hooks the glue’s molecules together, making it into a polymer instead of a liquid. (Actually, according to my Physics/Chemistry major son, it is now a non-Newtonian fluid.)

Kid’s of all ages (like smarty-pants college-age Mitch—those aren’t pre-school arms pictured above…) love the tactile sensation of Slime, and you may have trouble prying it away from adults to let the kids have at it. Just be warned that Slime and fabric are disastrous together, so keep it clear of your favorite tablecloth, jeans, barbie outfits, etc. It should be played with on a hard surface, with plastic or wood utensils or toys. And that’s the end of my disclaimer, so don’t come crying to me when you’ve got Slime stuck in your sleeping bags. (Been there, done that.)

Aside from pulling out this science experiment for bored kids in the summer, I also used to keep an “I’m Bored Jar” on the kitchen counter. Whenever my offspring uttered that dreaded phrase, they had to pick a piece of paper from the jar. They might get a fun activity like making Play-Doh or a marshmallow gun, or they might get a chore like picking up Legos or cleaning mirrors. After vacuuming Mom’s van (kidding…sort of), they learned to entertain themselves.

Makes 1 cup

4 or 7.62 ounce bottle of Elmer’s school glue
(Size of bottle doesn’t make a difference in outcome, but little kids will have an easier time managing the Slime made with 4 ounce bottle.)
2 cups distilled water, divided
10 + drops of food coloring
1 teaspoon Borax powder

1. Pour glue into small bowl. Fill the empty glue bottle with distilled water, leaving a little extra room at top. Add food coloring. (To get a lime green, add yellow food coloring to your water first, plus a few drops of green.) Put cap back on bottle and shake vigorously.

2. Pour colored water into bowl with glue and stir with wooden spoon.

3. In separate bowl, combine 1 cup distilled water and the Borax.

4. Slowly pour the colored glue into the Borax water and slowly stir. You will see globs and strings begin to form. Lift the globs out of the bowl with your hands and knead out water until smooth. Add extra strings of glue as you can, and combine.

5. Store in Ziplock back or plastic container with tight-fitting lid.

Ginger Crinkles

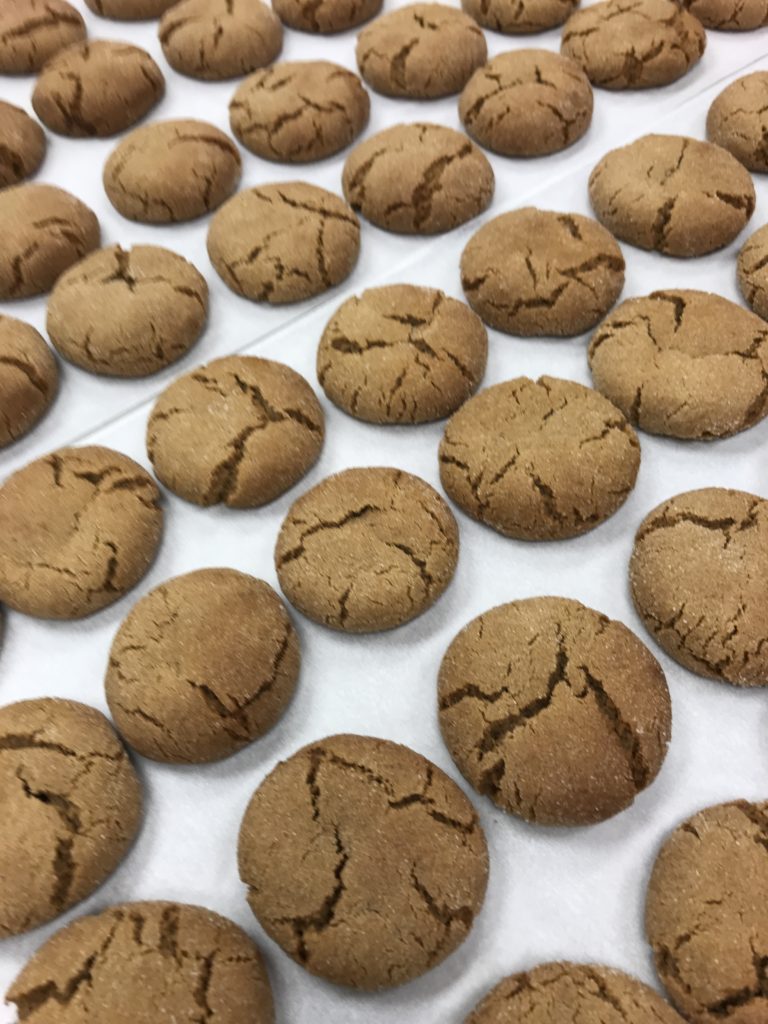
We’ve all bitten into gingersnap cookies that are so hard you practically break a tooth on them. This soft, chewy cookie has all the sweetness and spice of a gingersnap, but none of the dental danger. And these Ginger Crinkles are SO good, my 30-something nephew Jacob actually asked for a take-home bag when he and his wife had been over for dinner once. He said he wasn’t really a cookie person, but thought he’d try one to be polite, and then couldn’t stop.

It helps to serve them nice and warm, fresh from the oven, although they keep well in an airtight container. They’re a great fall and winter cookie, since they use the same spices as gingerbread, but your family—and guests!—will be happy to eat them year round. (I like to make these when Chocolate Chip and/or Monster Cookies are boring me. A nice change of pace.)

I found the recipe on the McCormick spice site several years ago, but it is no longer posted. They had used corn syrup in their recipe (which I don’t keep on hand), so I tried molasses instead. Worked great! And probably added more flavor, too. 

Makes 2 ½ dozen cookies

1 cup butter, softened to room temperature
1 ¼ cups granulated sugar
¼ cup dark molasses
1 egg
1 teaspoon vanilla
3 cups flour
2 teaspoons ground cinnamon
1 ½ teaspoons baking soda
1 teaspoon ground ginger
¼ teaspoon ground cloves
¼ teaspoon salt
¼ cup granulated sugar (for rolling cookies)

Preheat oven to 375° Fahrenheit. In large mixer bowl, cream butter. Slowly add white sugar, then molasses, and beat with electric mixer until fluffy. Add egg, and cream all ingredients. Add vanilla, and cream ingredients again.

In separate medium-size mixing bowl, combine flour, cinnamon, baking soda, ginger, cloves, and salt. Stir with spoon. Slowly add flour mixture to creamed butter and sugar mixture. Remove bowl from mixer.

Put ¼ cup white sugar in small bowl. Take spoonfuls of cookie dough and roll into balls. Roll each ball in sugar before placing on baking sheet. Bake in oven for 10-12 minutes. Remove pan from oven and cool for 5 minutes before removing cookies from baking sheet. Store in airtight container.

Lemon Caesar Salad Dressing

IMG_0919Fresh summer salads need a fresh summer dressing, and what tastes fresher than the zing of real lemon? This dressing recipe make-over from a Pillsbury Classic Cookbook circa August 1991 (those little grocery store booklets sold in the check-out lanes next to the trashy tabloids) uses sour cream as a thickening agent instead of the traditional coddled egg, so there’s no raw egg issues in this mix. I’ve made it with just torn romaine lettuce, grated Parmesan cheese, and big, buttery croutons, but that’s too limiting for this zesty salad topper. It’s great on any torn greens and vegetable combination you can dream up.

IMG_0924Pictured in my salad are curly leaf lettuce, chopped sweet red peppers and cucumber, jicama chunks, fresh basil, and grated heritage carrots (they’re purple—so they kinda look like bacon bits), and finally a sprinkling of grated Parmesan, as a nod to it’s Caesar roots. Be warned that lemon is the predominant taste in this dressing, so pucker up. (Mom and Janine, this one’s for you!) I’ve never used the anchovy paste suggested in the original recipe, and we’ve found it’s just dandy without it. In fact, I think it would make it far too salty. 

Most people know how Caesar salad got it’s name…but here’s a refresher just for kicks. It was created by Chef Caesar Cardini, an Italian immigrant who worked in kitchens in Mexico and the U.S. Legend has it that he came up with the concoction during a 4th of July rush when his kitchen supplies were running low, and these were the ingredients he had on hand. His original recipe didn’t use anchovies, either, so I guess I’m in good company there. Apparently, there are a variety of bottled dressings called “Cardini’s Caesar” to be found in grocery stores. But why buy it bottled when it’s so easy to make your own?

Makes about 3/4 cup dressing

1/2 cup extra virgin olive oil
3 tablespoons fresh lemon juice
1 tablespoon sour cream
1 teaspoon grated lemon peel
1 teaspoon Dijon mustard
1 teaspoon Worcestershire sauce
1-2 cloves garlic, minced (I typically use only one clove)
1/2 teaspoon salt
1/4 teaspoon course ground black pepper

Combine all ingredients in a bowl and whisk—or combine in a jar and shake vigorously—until smooth. Refrigerate until ready to use, or pour over salad greens and vegetables, and toss until greens are coated.