Monte Cristo Spinach Sandwiches

Divide mustard, cheese, ham/turkey, and spinach evenly between each of two bread slices; cover each with a bread slice. Whisk together eggs and milk in a medium bowl.

Melt butter in a large nonstick skillet over medium. Dip sandwiches in milk mixture; transfer to skillet, and cook until golden brown, about 3 minutes per side. Sprinkle with powdered sugar, and serve with raspberry jam or cranberry conserve.

*NOTE: I’ve added spinach to the Real Simple recipe. Again, always trying to up my veggie intake in my meals…

Turkey Peanut Satay Wraps

Thai-flavored fare a favorite with you, like it is for me? Then these savory turkey wraps will hit the spot. I got this recipe from a Bethel University student worker (Natalie G, that’s you!), who raved non-stop about it, and she had found it on iowagirleats.com. It went together pretty easy—about 30 minutes—and most of the ingredients were the kind of thing I had on hand. I’m not concerned about using soy sauce in recipes, but those who have zero tolerance for gluten would want to sub in gluten-free tamari sauce.

Now for the adjustments I made to the recipe—let’s start with the meat. It called for ground chicken, and I can’t recall seeing that in the grocery store. (And my husband refused to look for it when I sent him to the grocery store for the butterhead lettuce…so that kinda settled it!) Since I had ground turkey on hand, that’s what I used. Not a fan of gathering loads of specialty sauces in my cupboards and frig, I subbed in fresh minced garlic and dried chili powder for the recommended chili garlic sauce. Another addition was the scallions, as I thought they’d give it a nice bite.

It also seemed that the amount of sauce made in the recipe wouldn’t have covered the meat, so I doubled the peanut butter and coconut milk. I was glad I did, because it was JUST right. And so was the flavor!!! It was a great mix of spices, and the creaminess of the coconut milk and peanut better coated the meat perfectly. Once wraps were assembled, the crunch of the lettuce wrapped around the spiced meat mixture made for a thoroughly satisfying meal. (Could also be a killer appetizer!) If there’d been leftovers, I’d tell you how it tasted second day, but alas, we ate every last morsel. DEE-lish.

Serves 4

2 pounds ground turkey
1 tablespoon vegetable oil
2 large shallots, chopped, or 1 medium yellow onion, chopped
3-4 scallions (green onions), chopped
2-3 cloves minced garlic
1 teaspoon fresh grated ginger*
salt and pepper
½ cup peanut butter
½ cup coconut milk (I used a can of regular, not light, and mixed to include fat and coconut milk)
¼ cup chicken broth
2 tablespoons soy sauce (or gluten-free tamari sauce
1 tablespoon lime juice
1 tablespoon granulated sugar
1½ teaspoons sesame oil
1 teaspoon chili powder
1 teaspoon curry powder
*(If you don’t have fresh ginger, add 1 teaspoon ground ginger here)
¼ teaspoon red chili pepper flakes
¼ cup chopped fresh cilantro for garnish
¼ cup chopped dry roasted peanuts for garnish
2 heads of butterhead lettuce

Coat skillet with oil, and heat to medium-high. Add ground turkey, and cook until almost no pink remains in meat, breaking up meat as it cooks. Add shallots (or onions), scallions, and minced garlic, and cook until meat is no longer pink and garlic is fragrant. Turn down to low.

Combine coconut milk and peanut butter in large microwave-safe measuring cut or bowl and heat for 30 seconds. Stir until smooth. Add chicken broth, soy sauce, lime juice, sugar, sesame oil, chili powder, curry, and red pepper flakes. Stir until combined. Add to meat in skillet, and stir to coat. Turn element off.

Remove core from butterhead lettuce, and rinse. Pat dry. Line 4 plates with several leaves of lettuce, and add large dollop of meat mixture to plate. Put cilantro and chopped peanuts on table. Let each person assemble their own wraps, and top with peanuts and cilantro.

Chicken Tikka Masala

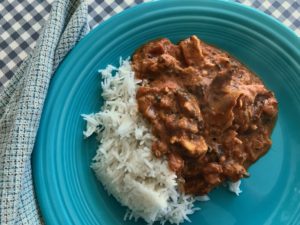
Fans of Indian food will love this smokey chicken dish, layered with rich spices in a creamy tomato sauce. My son Justin had been hinting that I try a curry dish sometime, but then he got bold and Facebooked me this recipe for Turkey Tikka Masala from The New York Times. It’s a dish that uses leftover Thanksgiving turkey, so I thought I’d give it a whirl. When I realized I didn’t have enough leftover turkey to do the dish, I opted to use fresh boneless, skinless chicken thighs. I had my husband Rich grill them on his Big Green Egg to get that Tandoor-tender treatment. This dish was utterly amazing, and that’s an understatement.

We’ve often wondered why all these Indian dishes that taste so similar have vastly different names, so I did a little research. Apparently, the names differ depending on the region, so a “rogan josh” can taste the same as a “masala” as they use the same ingredients. “Tikka” refers to chicken cooked in the Tandoor (a cylindrical clay oven), and “masala” is a sauce made with tomatoes and onions OR a mixture of spices, depending on your source of information. 

And what exactly is garam masala, other than a spice required in Indian recipes that you don’t have on hand? It’s a mix of peppercorns, cinnamon, cloves, mace, cardamom, bay leaves, and cumin—and is sometimes referred to as a “curry.” An Indian curry stew is usually a blend of coriander, cumin, and turmeric, and sometimes chili peppers. There’s no curry powder actually in curries. Curry is a word invented for the British or by the British to describe the delicious stews they “discovered” during their colonization of India.

But enough with the history lesson! Back to the food! I did a few things differently than the original recipe—like I didn’t puree the sauce, and I used half and half, instead of heavy cream. My other adjustments to process and ingredients are reflected below.

Serves 6

For Meat Marinade

2 teaspoons garam masala
2 teaspoons ground coriander
2 teaspoons ground cumin
1 tablespoon smoked Spanish paprika
4 teaspoons ground turmeric
1 teaspoon sea salt
6 cloves garlic, finely grated
4 teaspoons finely grated fresh ginger
1 cup plain Greek-style yogurt
1¾ pounds boneless, skinless chicken thighs

For Masala Sauce

4 tablespoons ghee, divided
1 large onion, chopped
1 teaspoon cardamom
1-2 bay leaves
1 teaspoon smoked Spanish paprika
½ teaspoon red pepper flakes
1 teaspoon garam masala
1½ teaspoons sea salt
2 tablespoons finely grated fresh ginger
4 cloves garlic, minced or finely grated
1 serrano pepper, minced
2 tablespoons tomato paste
2 (14-ounce) can diced tomatoes
2 cups half and half
¾ cup coarsely chopped fresh cilantro
Juice of 1 small lemon (optional)

3 cups cooked basmati or jasmine rice

To make the marinade: Combine the garam masala, coriander, cumin, paprika, turmeric, salt, garlic, ginger, and yogurt in a bowl and stir. Add chicken thighs and toss to coat. Cover with plastic wrap and refrigerate 4 hours or overnight.

To make the masala: Add 3 tablespoons of the ghee to a Dutch oven set on medium-high heat. Add onion, cardamom, bay leaf (or leaves), paprika, pepper flakes, garam masala, and salt. Reduce heat to medium and cook, stirring occasionally, until onions are golden and tender, about 10 to 15 minutes.

Make space among onions in center of pot, and add the remaining 1 tablespoon ghee. When ghee has melted, add ginger, garlic, and serrano pepper, and sizzle for about 10 seconds. Stir into the onions. Stir in tomato paste, then add tomatoes and juice. Bring to a boil, then reduce heat and simmer, stirring often, until the liquid is almost gone, about 8 to 10 minutes.

Add cream and chopped cilantro to the pot. Taste and add salt if needed. Simmer over low heat, stirring occasionally, until sauce thickens, about 40 minutes. *

While sauce is cooking, grill chicken until done, and no pink remains in center. Cut chicken into bite-sized pieces. Stir into masala sauce, and serve over cooked rice. (If adding lemon juice, stir in just before serving. I forgot the lemon, and did not think it needed it!)

*NOTE: The original recipe called for pureeing the sauce in a blender at this point, before adding the chicken in. I thought that was an unnecessary step, but might try that next time I make this so the sauce is creamier. And there will be a next time for this tasty dish!

Super BLT with Pesto Aioli

FullSizeRender‘Tis tomato time, and if you’ve got them coming out of your ears like we do, this twist on the classic BLT sandwich will help you use up your ‘maters. The pesto aioli gives it extra zip, and adds another layer of flavor to the fresh tomato, smoky bacon, and crisp lettuce. So I used up my stash of tomatoes AND my fresh basil pesto that I just made again—a win-win. I also added sliced turkey, and white cheddar cheese to these sandwiches, because I feel like a sandwich with just bacon for meat isn’t really a sandwich. (My husband would disagree—he fried up half a pound of bacon for his two sandwiches the night we made these. When I questioned his quantity, he called me a Bacon Nazi. Ouch. First time I’ve heard those two words together in a sentence…how about you?)

I thought that this might be too simple of a “recipe” to post, but I actually get the most response from all of you when I post stuff I think is too easy to bother sharing (aka: “Judy easy,” in the scale used previously). I used pumpernickel bread for the sandwiches pictured here, but I also like Trader Joe’s 100% rye bread, which I’ve been told is gluten-free. Either of those options gives you more flavor in your bread than straight up white bread. Another bonus! 

Serves 2-3

For pesto aioli
¼ cup Hellmann’s real mayonnaise (or make your own, recipe below!)
1 tablespoon fresh basil pesto

For sandwiches
Deli turkey, sliced thin
White cheddar cheese, sliced
Romaine lettuce leaves, rinsed and dried
Bacon strips, cooked (2 per sandwich, unless you’re Rich)
Sliced fresh tomatoes
Pumpernickel or rye bread, toasted

Slather toasted bread with generous amount of pesto aioli, then layer on turkey, cheese, lettuce, bacon, and tomatoes. Prepare to be amazed.

*NOTE: Aioli has come to be the name given to any flavored mayonnaise. Traditionally, it’s been an emulsified oil combined with fresh garlic. At least that’s the Spanish version. The French version of aioli has an egg added into the emulsifying process, which makes it more similar to mayonnaise than the Spanish recipe. Use the word “aioli” when you want to impress your dinner guests with your mad kitchen prowess.

To make your own mayonnaise (recipe courtesy of Whole30):
1¼ cups olive oil (not extra virgin), divided
1 egg
½ teaspoon dried mustard
½ teaspoon salt
Juice of 1 lemon

In food processor or blender, combine ¼ cup olive oil, egg, dried mustard, and salt. Blend until combined. Very, very slowly, drizzle in the remaining 1 cup of olive oil with motor running, and process until oil is emulsified (thickened to mayo consistency). Add juice of lemon and pulse until combined. Refrigerate for up to one week, but no longer.

Three-Bean Turkey Chili Con Carne

FullSizeRender-1It’s safe to say soup season is officially upon us, and this staple chili recipe is perfect for a filling lunch or a hearty dinner when the weather turns nippy. This is such a fave, that frankly, I’m surprised I’ve not posted it yet! Although, I need to give a disclaimer here. It used to be a family favorite for for everyone in our household, but when I first went back to working full-time a dozen years ago, I was hard-pressed to come up with recipes to throw on the table in a hurry after 5 p.m. I had previously been freelancing from home, and could putz in the kitchen between projects. That luxury was lost when I had to be elsewhere from 8-5. Sooooooo… I would whip up a batch of this chili in the evening or weekends to have on hand for dinner. But apparently, I relied on this a little too much, and my sons started groaning, “Chili, AGAIN???”

We took a much-needed break from chili, and I found other recipes I could make in a snap when we needed to eat and run to guitar lessons or hockey practice, etc. (Many of those fast favorites have been posted on this blog.) Were my offspring a little harsh on me regarding this dutiful recipe? I think so. Especially when my son Brandon made this for a church youth group chili cook-off fundraiser, and won the coveted first prize trophy—an ancient can of beans glued to a block of wood bearing a “First Prize” plaque. (Helped that he’s stinkin’ cute and there were lots of teen girls voting…) Who’s dissing my chili NOW, huh?

The original recipe came from my Mom’s friend Arlene, one of those women who always makes great food. I believe she got the recipe from the St. Paul Pioneer Press sometime in the 70’s, but I’m not sure. (Feel free to comment, Arlene!) I’ve altered to suit our changing tastes, and now use turkey instead of hamburger, and have added black beans (unheard of among suburbanites in the 70’s), butter beans, more vegetables, and some additional seasonings. Serve this with the Corn Bread recipe previously posted, and you’ve got a winning combination. Maybe even first place.

Serves 10-12 (But freezes well, if that’s more than you need!)

Rating: Easy

1-1¼ pounds ground turkey (or hamburger)
1 medium or large yellow onion, chopped
1 green pepper, chopped
2-3 carrots, peeled and chopped
1 small zucchini, chopped (optional)
3 (14.5 ounce) cans diced tomatoes
2 (14.5 ounce) cans tomato sauce
2 (15 ounce) cans black beans with cumin and chili spices (do NOT drain)
2 cans corn
1 (15 ounce) can dark red kidney beans
1 (15-16 ounce) can butter beans
1-1½ tablespoons regular chili powder
1 tablespoon chili con carne seasoning (optional)
2 teaspoons ground cumin
1½-2 teaspoons salt

Toppings

Grated sharp cheddar cheese
Chopped scallions
Sour cream

In large fry pan, cook turkey until no pink remains. Put into large Dutch oven, or other large pot in which you will be simmering your chili. Using same fry pan, sauté onion for 2-3 minutes. Add green pepper, carrots, and zucchini (if using). Sauté until onions are translucent, and other vegetables are slightly softened.

Add diced tomatoes, tomato sauce, and black beans to pot with cooked turkey. Stir in sautéed onion mixture. In colander, rinse and drain corn, kidney beans, and butter beans. Once drained, add to pot. Stir in chili powder, chili con carne seasoning (if using), cumin, and salt. Bring mixture to a boil, stirring occasionally. Reduce to simmer, and cook on low for 30-60 minutes. Serve with toppings. Or store in frig to serve later.

Tortillas for Tacos

IMG_0820Once you get the hang of this recipe, these tasty tortillas can be used for a variety of dishes, from tacos, to fajitas, to fresh sandwich wraps. They can be stored in the frig for up to a week (with parchment paper between each tortilla to keep them from sticking together), and briefly reheated on a skillet if needed. I’ve tried to make masa (corn) tortillas from scratch, but did not succeed. I need a Mexican grandma to teach me the trick to those, and sadly, I don’t have one of those in my family tree. (My lineage is more lefse than limonada.) So for now I’m sticking with these flour tortillas for our tacos. Directions and ingredients below are for making tacos or burritos at home to rival Chipotle fare. Seriously. 

Makes 8-10

Tortillas

2½ cups flour
1 teaspoon baking powder
¼ teaspoon salt
¼ cup shortening
1¼ cups boiling water
Vegetable oil

In large mixing bowl, stir together flour, baking powder and salt. Cut in shortening with a pastry blender or tines of a fork to combine. Pour in boiled water, starting with 1 cup and stirring with wooden spoon. If mixture is still too dry, add more water until flour pulls away from sides of bowl and dough holds together in a ball.

Dust large cutting board with flour and drop dough onto board. Sprinkle dough with more flour and knead until elastic. Drop dough into oiled bowl (use vegetable oil, not olive oil), and turn to coat. Cover bowl and let dough rest in warm, draft-free spot for 10 minutes.

Heat large griddle or skillet to high and brush with vegetable oil. Drop dough onto floured board and divide into 8 or 10 pieces. Form each piece into a ball, and then roll a ball out to about 8 inches in diameter. (The tapered French rolling pin the is perfect tool for making these.) Dough should be very thin, almost to the point of tearing. Carefully move tortilla to hot griddle. Tortilla is ready to flip when large bubbles form on top. Do NOT “pat down” tortillas as they cook! Allow air pockets to form in dough as it cooks. Flip, then brown lightly on reverse side. Remove tortilla to plate and repeat with remaining balls of dough.

Top tacos with:

One recipe Mean Mexican Rice
1 pound ground turkey, cooked in skillet, and seasoned with taco seasoning (My preference is Penzy’s Chicken Taco Seasoning—2 tablespoons per pound of meat.)
Monty Jack cheese
1 can black beans, rinsed and drained
Tomatoes, chopped
Green peppers, chopped
1 can corn, drained
Scallions, chopped, or red onion, chopped
Black or Kalamata olives, chopped
Lettuce, chopped
Guacamole
Sour cream
Salsa

Brined and Smoked Turkey

Smoked Turkey IMG_0616A man and his meat. It’s a beautiful thing. My husband Rich loves, loves, LOVES to grill, and with the recent addition of a Big Green Egg to his fleet of fiery furnaces, he’s learning a whole new way to barbecue. This brined turkey recipe from Weber Grill’s website has received rave reviews from the guests at our table, so I think it’s safe to say it’s a keeper. (He’s followed the recipe for the brine, but not tried the gravy yet, so that portion of the recipe is not included. The instructions below are for the Green Egg process which is charcoal, not a gas Weber grill.) Marinating in the brine takes 12-18 hours, and the smoking takes about 4-7, depending on the size of your bird. If it’s gorgeous out, it’s a great excuse for a guy to sit on the deck, soaking in the sunshine and enjoying the scent of smoked meat wafting through the air. If it’s cold and snowy (like this Christmas, when Rich smoked a bird for the extended family), it’s a labor of love. If he’s willing to labor, we’re willing to love it.

turkey on grillCouple tips. Rich found that the suggested 18-24 hours of brining made the bird far too salty, so he’s cut the brining time down considerably. He’s also found a handy chart on the Big Green Egg website with turkey tips. Rich slapped some slices of bacon on the big birds about halfway through smoking them. Why? Why not! He likes bacon.

In the photo at right, the two smaller birds are pheasants. Our son Brandon brought those pre-brined to a family party, and brushed reduced maple syrup on them as they smoked. Mmmmmmmmm. They were delicious.

Serves 8-12

For Brine

2 quarts apple juice
1 cup kosher salt
2 tablespoons dried rosemary
2 tablespoons dried thyme
1 tablespoon dried sage
1 teaspoon coarsely ground black pepper

For Turkey

1 whole turkey, 10 to 12 pounds, fresh or defrosted
1/2 cup unsalted butter, melted, divided
1 teaspoon freshly ground black pepper

Cooper and ChesterIn a large pot combine the brine ingredients. Stir vigorously until the salt is dissolved. Remove the neck and giblets from the turkey (and cook giblets for your dogs—our dog Cooper, and our granddog Chester love this part). Rinse the turkey inside and outside with cold water.

Partially fill a cooler with ice. Open a large, sturdy plastic bag in the cooler. Place the turkey, breast side down, in the bag. Carefully pour the brine over the turkey and then add 3 quarts of cold water. The turkey should be almost completely submerged. If some of the back is exposed above the brine, that’s fine. Press the air out of the bag, seal the bag tightly, close the lid of the cooler, and set aside for 12 to 18 hours.

Smoking Turkey

If using wood chips, soak in water for at least 1 hour (no need to soak wood chunks). For charcoal grill, fill a chimney starter to the rim with charcoal and burn the coals until they are lightly covered with ash. You will want to smoke turkey with indirect heat, so place coals to side of cooking area. Carefully place a large, disposable drip pan in the center of the charcoal grate and fill it about halfway with warm water. This will help to maintain the temperature of the fire. Put the cooking grate in place, close the lid, bring the heat up to 350° Fahrenheit with all vents open. Then set vents to almost closed to reduce to low heat (200°). (If using a gas grill, follow manufacturers instructions for smoking.)

Remove the turkey from the bag and rinse it, inside and outside, with cold water. Pat dry with paper towels. Discard the brine. Lightly coat the turkey with some of the melted butter. Season with the pepper.

Add two wood chunks or two handfuls of wood chips (drained) to the charcoal, and close the lid. When the wood begins to smoke, place the turkey in the center of the cooking grate. Position the bird so the turkey legs face the charcoal. Cook the turkey over indirect low heat, with the lid closed, for 1 hour.

After 1 hour, turn turkey breast-side up, and add more wood chips. Close the lid, and watch until the temperature is back up to 200°. Continue to cook the turkey with the lid closed, for a second hour, maintaining that 200° temperature.

At the end of the second hour, baste the turkey all over with the remaining butter. If any parts are getting too dark, wrap them tightly with aluminum foil. Continue to cook the turkey. The total cooking time will be 4-6 hours. The turkey is done when the internal temperature reaches 160° to 165° in the thickest part of the thigh (not touching the bone).

Transfer the turkey to a cutting board, loosely cover with foil, and let rest for 20 to 30 minutes before carving (the internal temperature will rise 5 to 10 degrees during this time). Carve the turkey, and serve.

Spinach and Artichoke Casserole

IMG_0910Casseroles are great because you can get most of your food groups in one dish, and the addition of artichokes in this recipe separates it from the tater tot hotdishes (that’s Minnesotan for “casserole”) of this world. It goes together quick enough that I’ve often made it before work and thrown it in the frig when we know we need dinner on the table in a hurry. It only takes about 30 minutes to assemble, and another 25-30 to bake. If you can’t eat it all in one sitting, no problem. It’s great left over, too!

The recipe comes from the Better Homes & Garden website. If you’re a Trader Joe’s fan, you’re in luck, because their Parmesan Romano Alfredo Sauce is perfectly suited to this recipe. In fact, you can pick up all the ingredients below at Trader Joe’s. I couldn’t find the suggested orzo pasta last time I was at their store, so I bought the Harvest Grains Blend of Israeli couscous, orzo, baby garbanzo beans, and red quinoa, and we actually liked it even better than the plain orzo because it has more texture. My other changes to the BH&G recipe? Added minced garlic, used a can of artichokes instead of frozen, subbed regular Alfredo for the light, and used white cheddar cheese instead of reduced fat Italian blend cheese. The ingredients and process below reflect my tweaking of the original recipe.

Serves 8

2 cups dried Trader Joe’s Harvest Grains Blend or orzo pasta
1 tablespoon vegetable oil
1 yellow onion, chopped
1 sweet red pepper, chopped
1-2 cloves of garlic, minced
12 ounces turkey (or chicken) breast tenderloin, cut into bit-sized pieces
4 cups fresh spinach, julienned, or chopped
1 (14 ounce) can of artichoke hearts, drained and quartered
1 (16 ounce) jar of Alfredo pasta sauce
1 cup shredded white Cheddar cheese
¼-½ cup Panko bread crumbs

Preheat oven to 350° Fahrenheit. Have 9″x13″ (or 2-quart square) baking dish ready to fill. Cook couscous blend or pasta according to package directions; drain and set aside.

While pasta is cooking, heat oil in large non-stick skillet set on medium-high heat, then add onion. Saute until onion is translucent. Add red pepper, and saute 1-2 minutes. Add garlic and stir until combined. Add turkey or chicken to hot skillet and cook for 6-8 minutes, or until meat is no longer pink. Stir occasionally. Transfer meat mixture to large bowl and stir in drained pasta, spinach, artichoke hearts, Alfredo sauce, and cheese. Stir to coat all ingredients. Spoon mixture into baking dish.

Bake for 15 minutes, uncovered. Sprinkle with Panko. Bake for another 10-15 minutes, or until heated through, and Panko is lightly browned. Let stand for 10-15 minutes before serving. (Ummmm…we never do. Just dig in!)

White Bean and Chicken Chili

FullSizeRenderIt was April in Minnesota and I was still seeing snowflakes out my window (noooooo!!!), so I decided soup was still on the menu. This recipe is not as heavy as a traditional chili, but more a cross between chicken soup and chili and is a whole meal in itself. I used to make it only when I had extra turkey on hand after Thanksgiving, but now I’ll buy a whole roasted chicken at the grocery store, and use that to get going on the soup. Make this when entertaining a crowd, or for a few, and freeze some for later. Since it’s not milk-based, it freezes really well. I found the skeleton of this recipe online years ago, but have tweaked and added to it so that it no longer resembles the original. The trace amount of ground cloves in the broth give a unique, yet compelling flavor twist to this southwestern-style soup.

Makes 8 servings

For soup:

2 tablespoons butter
1 large onion, chopped
1 green pepper, chopped
2 cloves garlic, minced
4 cups ½-inch pieces cooked chicken or turkey
3-4 cups canned or homemade chicken broth
2 tablespoons fresh cilantro, or 2 teaspoons dried cilantro
1 teaspoon dried basil
2 teaspoons chili powder
1/8 teaspoon ground cloves
2 cans (15-16 oz. each) great northern beans, drained
2 cans (15 oz. each) corn, drained
2 cans (15 oz.) diced tomatoes, undrained

Garnish:

Blue or yellow corn tortilla chips, crushed
Sour cream (optional)
Grated Monty Jack cheese (optional)

Melt butter in large Dutch oven over medium heat. Cook onion first until translucent, and add green peppers to sauté until slightly tender, about 3 minutes. Add garlic and cook for 2 minutes more, stirring often. Stir in all remaining ingredients and bring to a boil. Reduce to a simmer. Cover and simmer for 1 hour, stirring occasionally. Serve soup with crushed chips and sour cream or cheese, if desired.

NOTE: This recipe is gluten-free if you make your own chicken broth, and use 100% corn tortilla chips.