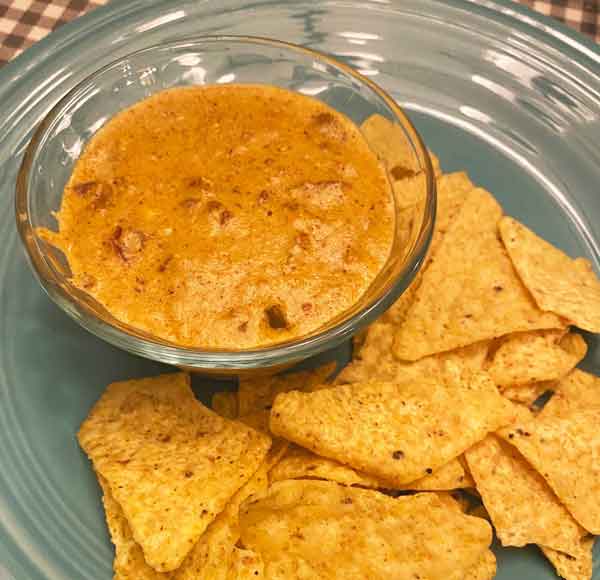
Crockpot Queso

Creamy cheesey goodness with minimal effort. Yes, please!
(Photo credit shout-out to my daughter-in-law Ashley.)

Desperate times cause for desperate measures, and I’d say being quarantined in your home for weeks on end calls for cheese. Lots and lots of warm, gooey cheese. I ran across this recipe in the January/February 2020 issue of Martha Stewart’s Living magazine and thought it sounded too easy to be any good. But I was wrong. Well, not wrong about the easy part—it goes together in less than 5 minutes. I was wrong about the good part. It is delicious!!! I’ve now made this in my new little 2-quart Crockpot ($9.96 at Walmart, purchased using appropriate social distancing, of course) several times. Once I got over the fact that I had to purchase American cheese for the first time in my life, that is. Why is it that the lowest-quality, most bland cheese ever made is called “American cheese”? Don’t answer that…

We’ve eaten it straight up as dip for tortilla chips, and once with little smokie sausages I’d wrapped in homemade pizza dough and baked in the oven. (Yes, our food standards have slipped a bit. See: “desperate times” above.) The best part about this dip is that it is smooth and silky—and stays that way! I highly recommend this when you need a cheesy goodness fix, and no judgment from me for what you choose to slip into this dip.

Makes 4 cups

INGREDIENTS
8-ounces pepper Jack cheese, shredded
4-6 slices of American cheese
2 teaspoons cornstarch
10-ounce can diced tomatoes with chilies (Ro-tel brand is great!)
12-ounce can of evaporated milk
kosher or sea salt

OPTIONAL TOPPINGS
diced red onion
diced jalapeno
chopped cilantro

Toss cheeses and cornstarch together in 1.5 or 2-quart slow cooker. Stir in diced tomatoes and milk, and season with salt. Cover and cook until bubbling and thickened, about 2 to 2 1/2 hours. Stir again before serving. If desired, sprinkle diced toppings on before serving. I don’t need to tell you to enjoy, because you totally will.


Monte Cristo Spinach Sandwiches

Divide mustard, cheese, ham/turkey, and spinach evenly between each of two bread slices; cover each with a bread slice. Whisk together eggs and milk in a medium bowl.

Melt butter in a large nonstick skillet over medium. Dip sandwiches in milk mixture; transfer to skillet, and cook until golden brown, about 3 minutes per side. Sprinkle with powdered sugar, and serve with raspberry jam or cranberry conserve.

*NOTE: I’ve added spinach to the Real Simple recipe. Again, always trying to up my veggie intake in my meals…

Sausage Mushroom Egg Bake

unnamedGood egg bake” is often an oxymoron, but this recipe with sausage, mushrooms and roasted red peppers isn’t the usual tasteless mush served at potlucks across the Heartland. I found this recipe called “Patsy’s Egg Casserole” on the Midwest Living website when I was looking for brunch recipes to serve at my son Mitchell’s high school graduation open house a few years ago (a tradition unique to Minnesota, I hear). My mother, sister Susan, and a couple friends all made a pan or two of this and the bacon/asparagus variation, and every single dish was delicious! It’s truly a fool-proof recipethere were no differences in outcome between cooks. You could even say this is Judy easy! (For my sister Judy who doesn’t love cooking like I do…)

My trick to keep it from slipping into soggy, is to use french bread loaves instead of a sliced loaf of white bread. French bread is stiffer, and the fact that it has more crust helps too. The other reason I love this recipe, is that there’s no butter in it. Not that I have anything against butter—it’s often a staple ingredient in my recipes!—but I’ve had so many egg bakes that were positively swimming in melted butter, and that’s just diary overkill. 

Just made this recipe for a birthday brunch for my daughter-in-law Jessica, and we all remembered how much we liked it, so I thought it was about time to post this breakfast, brunch, or brinner winner. My husband loves it so much, that the first words out of his mouth this morning were, “Is there anymore of that egg bake left?” Good morning to you too, sweetheart.

Serves 6-8

1 pound uncooked Italian sausage or ground pork
2 cups (8 ounces) fresh cremini or button mushrooms, rinsed and sliced
1 (8 ounce) jar roasted red peppers, drained and chopped
8 cups cubed French bread
2-3 cups shredded cheddar cheese
8 eggs
3 cups milk
1½ teaspoons dry mustard
½ teaspoon salt
¼ teaspoon cayenne pepper

Lightly coat a 9″x13″ baking dish with cooking spray. Set aside. In a large skillet, cook sausage and mushrooms on high until sausage is no longer pink. Drain off fat and extra moisture. Stir red peppers into mix and set aside. Place half of the bread cubes in prepared baking dish. Top with half of the sausage mixture, and half of the cheese. Repeat with remaining bread, sausage mixture, and cheese.

In a large mixing bowl, beat eggs with whisk attachment. Slowly pour in milk and whisk again. Sprinkle dry mustard, salt, and cayenne over eggs and milk, and beat one last time to combine. Carefully pour egg mixture over the layered bread mixture in dish. Gently press down the bread using the back of a large serving spoon to get it to absorb some of the egg and milk. Cover and chill for at least 2 hours or up to 24. (NOTE: The beauty of this recipe is that you can make it ahead! I love to make this the night before serving. Quick and easy party the next day…)

Preheat oven to 325° Fahrenheit. Bake uncovered for 50-60 minutes, or until skewer inserted in center comes out clean. Let stand for 10 minutes before serving.

BACON AND ASPARAGUS EGG BAKE VARIATION

Prepare as above, except replace sausage with 8 strips of crisp-cooked bacon. Cool bacon, and crumble or chop. Replace mushrooms with one bundle of fresh asparagus. Cut asparagus into bit-sized pieces (snapping off tough ends), and drop into salted boiling water for 1-2 minutes. Drain asparagus, then toss in bowl with bacon and chopped roasted red peppers. Use 2-3 cups shredded Swiss cheese instead of cheddar cheese.

Buffalo Chicken Potato Casserole

FullSizeRender-4There’s a great divide in our house, and it’s over this casserole. People either love the creamy Buffalo chicken kick, or they hate it. What’s really weird, is that I’m the one who loves it most, and I’m not much for heat in my food! This recipe was featured on Rachel Ray’s most requested recipes of 2013 show, but I’ve made a few adjustments—like halving the amount of hot sauce, and making more of the béchamel (aka: white sauce). The only ingredients you probably need to grab at the grocery store, are Frank’s hot sauce and a rotisserie chicken. Other than that, it’s basics like potatoes, butter, flour, and cheese. I’ve made it with red potatoes, and russets, and it does seem to work better with the russets for some reason. Use a flour substitute in the sauce, and this dish fills the craving for creamy pasta if you’re doing gluten-free diet.

And where do the famous Buffalo wings get their name? Buffalo, New York, of course, not the 1-ton beast. The story goes that more than 50 years ago, Teressa Bellissimo, owner and cook at the Anchor Bar in Buffalo, New York had gotten a whole crate of chicken wings by mistake, and wasn’t sure what to do with the excess, parts that were usually used only in soups. She came up with the idea to serve them deep friend and bathed in her secret hot sauce, with celery sticks and creamy blue cheese dressing on the side. They were such a hit, that the bar became infamous for her happy accident.

6 tablespoons butter
6 tablespoons all-purpose flour or Namaste gluten-free flour blend
1 teaspoon dry mustard
2½-3 cups milk
1/2 cup of Frank’s Red Hot original cayenne pepper sauce
Salt and pepper to taste
Dash of nutmeg
4 large russet potatoes, peeled and sliced thin (1/8″)
3 cups shredded Monty Jack cheese
1 store-bought rotisserie chicken, skin removed, and meat shredded (approx. 4 cups meat)

Preheat oven to 400°. To make béchamel sauce: In medium sauce pan, melt butter over medium heat. Sprinkle in flour and dry mustard, and stir to combine. Gradually whisk in milk to avoid lumps in sauce (start with 2½ cups and add more milk if sauce needs thinning later). Stir in hot sauce and bring to a boil. Reduce heat to simmer. Season with salt, pepper, and nutmeg. Sauce is thick enough when it coats a spoon when stirred.

In a 9″x13″ baking dish, spoon a thin layer of béchamel sauce on bottom, and layer with 1/3 of the sliced potatoes. Cover with 1/3 of the shredded chicken, 1/3 of the cheese, and 1/3 of the béchamel. Repeat layers twice, finishing with the cheese rather than the béchamel. Cover with foil and bake for 1 hour. Remove foil and bake for an additional 30-45 minutes or until bubbly and golden brown. Let sit for 10-15 minutes before serving.

NOTE: This dish is great left over as well. In fact the flavors mellow, and I actually prefer it second-day.

Cream of Cauliflower Soup

IMG_1140As this creamy cauliflower soup prepares in about 30 minutes, you can get a light, healthy lunch on the table fairly fast. I found the basic recipe in Midwest Living magazine (Feb 2013), and it was titled “Cream of Any-Vegetable Soup.” I’ve done cauliflower and also broccoli, but we liked the cauliflower best. One problem—they must have taste-tested this recipe on a family of gnats, cause the first time I made it, it served up 2 small bowls. Not worth the effort for such a small yield! So I doubled it. I also found that their recipe used far too little vegetable, so I significantly increased that—more so than the other ingredients. If you prefer broccoli to the cauliflower, I’ve included the instructions for that at the end of the recipe as well.

Serves 6

4 cups cauliflower florets
¼ cup chopped celery
¼ cup chopped onion
¼ cup (4 tablespoons) butter
¼ cup all-purpose flour or Namaste gluten-free flour blend
1 teaspoon instant chicken bouillon granules or 1 cub chicken bouillon, crushed
1 teaspoon curry powder
½ teaspoon salt
¼ teaspoon course ground black pepper
4 cups milk
Dash Worcestershire sauce
½ cup shredded sharp cheddar cheese, optional (but really, since when is cheese in anything “optional”?)

Place half of cut cauliflower in microwave safe bowl, cover with plastic wrap, and microwave on high for 3 minutes. Repeat with other half of cut cauliflower, and set aside cooked vegetables.

In a heavy saucepan or small Dutch oven, sauté celery and onion in butter until tender. Stir in flour and bouillon granules, curry, salt, and pepper. Allow flour and seasonings to “toast” for about a minute to bring out flavor. Gradually stir in milk, whisking it into flour until combined to avoid lumps. Add Worcestershire sauce. Cook and stir until thick and bubbly, then cook and stir for another minute. Stir in cooked cauliflower. Allow mixture to cook slightly, then place in blender (1/3 at a time), and blend for about 3 seconds. Repeat until all of soup has been processed. Return to saucepan to heat through. Add cheese and stir until melted. Serve.

For Broccoli-cheese Soup: Add 4 cups cooked broccoli florets instead of cauliflower, omit the curry and use ½ teaspoon garlic salt or garlic powder instead, and increase the cheese to 1 cup.

Chicken Enchiladas

FullSizeRender-1Fresh cilantro and parsley take these easy enchiladas up a notch in flavor, so much so, that no one will know the main ingredients are store-bought salsa and tortillas. They’re a great make-ahead meal you can refrigerate, then pop in the oven for a simple weeknight dinner. Or dress them up with a side of fresh guacamole and corn chips, plus a green salad, and you’ve got a company meal that wasn’t a ton of work. I got this recipe years ago from a friend who said it came from a low-cal cookbook, but I’ve always used real cheese (not the recommended reduced-fat stuff), and upped the cheese amounts, so I make no claim that this is still a diet dinner.

FullSizeRender-2IMG_1055Make it even easier by grabbing a already-roasted rotisserie chicken, or grill your own chicken breasts or tenderloins for the meat. If neither of those options work for you, fry up your chicken in a pan. Fresh herbs too pricey? You can use dried herbs, but you’ll take a bit of a hit in end-product taste. Fortunately, the lime and garlic will still bring the zip to the recipe, so you’re safe. A blender or food processor is your secret weapon, making short work of the salsa sauce that is the base of this dish.

Not only is this a quick family dinner, it’s a perfect recipe to have in your arsenal for bringing to friends who need a meal post-baby or due to family crisis. Kids will eat it cause the “green stuff” is pulverized into the sauce and won’t offend their picky little eyeballs, and adults love it because it’s not lasagna or spaghetti, the usual drop-off meals. I’ve not yet tried it using corn tortillas instead of flour, but I’m thinking that would sub in nicely for a gluten-free alternative.

2 cups mild salsa (Pace thick and chunky salsa or picante is just fine!)
1/4 cup fresh cilantro leaves (or 1 tablespoon dried cilantro)
1/4 cup fresh parsley leaves (or 1 tablespoon dried parsley)
1 tablespoon fresh-squeezed lime juice
1 teaspoon fresh lime zest
½-1 clove garlic, quartered
4 cooked chicken breasts, cubed, or 8 cooked chicken tenderloins, cubed, or 2 cups shredded rotisserie chicken
1 cup shredded mozzarella or monterey jack cheese
1 cup shredded sharp cheddar cheese

8 flour tortillas or 12 corn tortillas

Preheat oven to 350° Fahrenheit. Combine salsa, cilantro, parsley, lime juice and zest, and garlic in blender or food processor, and pulse until sauce is smooth. Mix half of salsa sauce with cut-up, cooked chicken, ½ cup mozzarella, and ½ cup cheddar cheeses in large bowl, and toss to combine. Place about ¼ cup of meat mixture down center of tortilla, roll up, and place seam side down in a 9″x13″ baking dish. Continue with remaining tortillas. Pour remaining salsa mixture over the tortillas in pan, and top with remaining grated cheese. Bake 20-25 minutes uncovered. (Can also cover with foil and refrigerate for 1-2 days before baking.)

Three-Bean Turkey Chili Con Carne

FullSizeRender-1It’s safe to say soup season is officially upon us, and this staple chili recipe is perfect for a filling lunch or a hearty dinner when the weather turns nippy. This is such a fave, that frankly, I’m surprised I’ve not posted it yet! Although, I need to give a disclaimer here. It used to be a family favorite for for everyone in our household, but when I first went back to working full-time a dozen years ago, I was hard-pressed to come up with recipes to throw on the table in a hurry after 5 p.m. I had previously been freelancing from home, and could putz in the kitchen between projects. That luxury was lost when I had to be elsewhere from 8-5. Sooooooo… I would whip up a batch of this chili in the evening or weekends to have on hand for dinner. But apparently, I relied on this a little too much, and my sons started groaning, “Chili, AGAIN???”

We took a much-needed break from chili, and I found other recipes I could make in a snap when we needed to eat and run to guitar lessons or hockey practice, etc. (Many of those fast favorites have been posted on this blog.) Were my offspring a little harsh on me regarding this dutiful recipe? I think so. Especially when my son Brandon made this for a church youth group chili cook-off fundraiser, and won the coveted first prize trophy—an ancient can of beans glued to a block of wood bearing a “First Prize” plaque. (Helped that he’s stinkin’ cute and there were lots of teen girls voting…) Who’s dissing my chili NOW, huh?

The original recipe came from my Mom’s friend Arlene, one of those women who always makes great food. I believe she got the recipe from the St. Paul Pioneer Press sometime in the 70’s, but I’m not sure. (Feel free to comment, Arlene!) I’ve altered to suit our changing tastes, and now use turkey instead of hamburger, and have added black beans (unheard of among suburbanites in the 70’s), butter beans, more vegetables, and some additional seasonings. Serve this with the Corn Bread recipe previously posted, and you’ve got a winning combination. Maybe even first place.

Serves 10-12 (But freezes well, if that’s more than you need!)

Rating: Easy

1-1¼ pounds ground turkey (or hamburger)
1 medium or large yellow onion, chopped
1 green pepper, chopped
2-3 carrots, peeled and chopped
1 small zucchini, chopped (optional)
3 (14.5 ounce) cans diced tomatoes
2 (14.5 ounce) cans tomato sauce
2 (15 ounce) cans black beans with cumin and chili spices (do NOT drain)
2 cans corn
1 (15 ounce) can dark red kidney beans
1 (15-16 ounce) can butter beans
1-1½ tablespoons regular chili powder
1 tablespoon chili con carne seasoning (optional)
2 teaspoons ground cumin
1½-2 teaspoons salt

Toppings

Grated sharp cheddar cheese
Chopped scallions
Sour cream

In large fry pan, cook turkey until no pink remains. Put into large Dutch oven, or other large pot in which you will be simmering your chili. Using same fry pan, sauté onion for 2-3 minutes. Add green pepper, carrots, and zucchini (if using). Sauté until onions are translucent, and other vegetables are slightly softened.

Add diced tomatoes, tomato sauce, and black beans to pot with cooked turkey. Stir in sautéed onion mixture. In colander, rinse and drain corn, kidney beans, and butter beans. Once drained, add to pot. Stir in chili powder, chili con carne seasoning (if using), cumin, and salt. Bring mixture to a boil, stirring occasionally. Reduce to simmer, and cook on low for 30-60 minutes. Serve with toppings. Or store in frig to serve later.

Tortillas for Tacos

IMG_0820Once you get the hang of this recipe, these tasty tortillas can be used for a variety of dishes, from tacos, to fajitas, to fresh sandwich wraps. They can be stored in the frig for up to a week (with parchment paper between each tortilla to keep them from sticking together), and briefly reheated on a skillet if needed. I’ve tried to make masa (corn) tortillas from scratch, but did not succeed. I need a Mexican grandma to teach me the trick to those, and sadly, I don’t have one of those in my family tree. (My lineage is more lefse than limonada.) So for now I’m sticking with these flour tortillas for our tacos. Directions and ingredients below are for making tacos or burritos at home to rival Chipotle fare. Seriously. 

Makes 8-10

Tortillas

2½ cups flour
1 teaspoon baking powder
¼ teaspoon salt
¼ cup shortening
1¼ cups boiling water
Vegetable oil

In large mixing bowl, stir together flour, baking powder and salt. Cut in shortening with a pastry blender or tines of a fork to combine. Pour in boiled water, starting with 1 cup and stirring with wooden spoon. If mixture is still too dry, add more water until flour pulls away from sides of bowl and dough holds together in a ball.

Dust large cutting board with flour and drop dough onto board. Sprinkle dough with more flour and knead until elastic. Drop dough into oiled bowl (use vegetable oil, not olive oil), and turn to coat. Cover bowl and let dough rest in warm, draft-free spot for 10 minutes.

Heat large griddle or skillet to high and brush with vegetable oil. Drop dough onto floured board and divide into 8 or 10 pieces. Form each piece into a ball, and then roll a ball out to about 8 inches in diameter. (The tapered French rolling pin the is perfect tool for making these.) Dough should be very thin, almost to the point of tearing. Carefully move tortilla to hot griddle. Tortilla is ready to flip when large bubbles form on top. Do NOT “pat down” tortillas as they cook! Allow air pockets to form in dough as it cooks. Flip, then brown lightly on reverse side. Remove tortilla to plate and repeat with remaining balls of dough.

Top tacos with:

One recipe Mean Mexican Rice
1 pound ground turkey, cooked in skillet, and seasoned with taco seasoning (My preference is Penzy’s Chicken Taco Seasoning—2 tablespoons per pound of meat.)
Monty Jack cheese
1 can black beans, rinsed and drained
Tomatoes, chopped
Green peppers, chopped
1 can corn, drained
Scallions, chopped, or red onion, chopped
Black or Kalamata olives, chopped
Lettuce, chopped
Guacamole
Sour cream
Salsa

Haystack Taco Dip

Haystack Salad IMG_0608So many appetizers rely on a brick of cream cheese as base, but this taco-flavored dip is chock full of fresh ingredients like tomatoes and alfalfa sprouts—and no cream cheese! And it’s probably the best thing you’ll ever dip with a chip. It’s a great appetizer for graduation open houses or other buffets as it doesn’t need to be kept hot, or cold. In fact, that’s where I first tasted this concoction, at my friend Laurie’s open house for one of her daughters. Laurie called her recipe “Haystack Salad,” but my family has always called it “that taco dip.” Laurie’s directions were to use a can of Hormel no bean chili as the base, or refried beans in a pinch. It seems Hormel has quit producing that item—I’ve not been able to find no bean chili for several years now, and the refried beans work perfectly well instead.

One way to make this dip extra great, is to get some Penzy’s taco seasoning. It has less salt and more flavor than the stuff you get in the foil packets at the grocery store. You can order the taco seasoning through Penzy’s website, and hey, grab some cinnamon and vanilla while you’re at it! (Last time I ordered, they shipped free with a $50 order, so you might as well stock up on other spices and seasonings.)

The other thing you’ll like about this appetizer, is that it goes together in about 15 minutes (or less if you enlist the help of someone to shred cheese) and requires no baking. Have I convinced you to try this one yet?

Serves 10-12

1 – 16 ounce can of refried beans
4 tablespoons Penzy’s taco seasoning or 1 package of other taco seasoning
3 ripe avocados
1 cup sour cream
3 tablespoons fresh lemon juice
1 – 4 ounce can of diced mild green chilies
1 – 4.25 ounce can of chopped ripe olives
1/2 cup chopped scallions (about 4 scallions)
1 cup shredded monty jack cheese
1 cup shredded sharp cheddar cheese
3 tomatoes, diced
1/3 to 1/2 container of alfalfa sprouts
Tortilla or corn chips

Combine refried beans and taco seasoning in a small bowl. Spread on the bottom of a glass 9″x13″ baking dish. In another small bowl, add avocados, sour cream, and lemon juice together and mash until combined. Spread on top of the refried bean mixture. Drain the green chiles, and sprinkle on top of the avocado layer, followed by the chopped ripe olives, then the scallions. Next sprinkle monty jack cheese, and then cheddar cheese. After dicing the tomatoes, strain them to get rid of the extra juice. Add tomatoes on top of the cheeses, and finish with the alfalfa sprouts. If not serving immediately, cover with plastic wrap and refrigerate for up to 24 hours. Serve with tortilla or corn chips. But remember, no double-dipping!