Fish Tacos

Smoked fish, sweet nectarines, and savory cabbage slaw make an interesting flavor combo in these fish tacos. The first time I saw “fish tacos” on a menu, I thought it sounded disgusting. Fish? In a taco? Was this an SNL fake commercial or something, like Bass-o-matic? But then a soul braver than me ordered them, and offered me a taste. Ever since then, I’ve been trying to re-create great fish tacos at home. And I think I finally nailed it.

Parts of this recipe came from Bobbie Flay, of Food Network fame. But it’s been twisted and tweaked so it no longer resembles the original, and I can safely claim it as my own. You can certainly grill the fish, but we’re Big Green Egg disciples. My husband prefers to use his BGE smoker any time he can, as it does give meat and fish an amazingly complex flavor. But if a Webber (or other gas grill) is what you’ve got, then go for it! No harm done there.

Makes 8-10 tacos

For Cabbage Slaw
1/3 head of green cabbage, sliced thin and then chopped
6 leaves of Napa cabbage, jullienned
2-3 carrots, grated
1 sweet red pepper, diced
½ of a yellow onion, diced
½ cup diced jicama (optional)
½ cup Hellmann’s mayonnaise
2 teaspoons Penzy’s Northwoods seasoning OR 1 teaspoon sweet paprika, plus dash each salt, pepper, thyme, cracked or powdered rosemary, and garlic powder

Combine all ingredients in large bowl and stir until dressing is incorporated. Set aside or cover and chill until serving tacos.

For Nectarine Salsa
2 ripe nectarines (or peaches)
2 tablespoons minced red onion
Handful or fresh mint leaves, rinsed, and diced

Combine all ingredients in bowl and stir. If not using immediately, cover and refrigerate.

For Fish Tacos
8-10 tilapia (or other mild white fish) fillets
Vegetable oil
Lime juice
Seasonings of choice, such as Penzy’s Foxpoint seasoning (dried shallots and salt), Smoked Spanish Paprika—but even just salt and pepper would be fine.

8-10 purchased corn tortillas

Heat grill to high. Combine oil, lime juice, and seasonings in Ziplock bag and let sit for a few minutes. Place fish in an oiled grill basket or brush grill with oil if placing directly on grill. Grill fish until white and no longer translucent. Break into pieces with fork. Add cooked fish to tortillas with cabbage slaw and nectarine salsa.

Chicken Tikka Masala

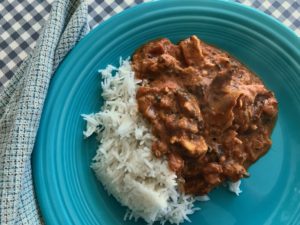
Fans of Indian food will love this smokey chicken dish, layered with rich spices in a creamy tomato sauce. My son Justin had been hinting that I try a curry dish sometime, but then he got bold and Facebooked me this recipe for Turkey Tikka Masala from The New York Times. It’s a dish that uses leftover Thanksgiving turkey, so I thought I’d give it a whirl. When I realized I didn’t have enough leftover turkey to do the dish, I opted to use fresh boneless, skinless chicken thighs. I had my husband Rich grill them on his Big Green Egg to get that Tandoor-tender treatment. This dish was utterly amazing, and that’s an understatement.

We’ve often wondered why all these Indian dishes that taste so similar have vastly different names, so I did a little research. Apparently, the names differ depending on the region, so a “rogan josh” can taste the same as a “masala” as they use the same ingredients. “Tikka” refers to chicken cooked in the Tandoor (a cylindrical clay oven), and “masala” is a sauce made with tomatoes and onions OR a mixture of spices, depending on your source of information. 

And what exactly is garam masala, other than a spice required in Indian recipes that you don’t have on hand? It’s a mix of peppercorns, cinnamon, cloves, mace, cardamom, bay leaves, and cumin—and is sometimes referred to as a “curry.” An Indian curry stew is usually a blend of coriander, cumin, and turmeric, and sometimes chili peppers. There’s no curry powder actually in curries. Curry is a word invented for the British or by the British to describe the delicious stews they “discovered” during their colonization of India.

But enough with the history lesson! Back to the food! I did a few things differently than the original recipe—like I didn’t puree the sauce, and I used half and half, instead of heavy cream. My other adjustments to process and ingredients are reflected below.

Serves 6

For Meat Marinade

2 teaspoons garam masala
2 teaspoons ground coriander
2 teaspoons ground cumin
1 tablespoon smoked Spanish paprika
4 teaspoons ground turmeric
1 teaspoon sea salt
6 cloves garlic, finely grated
4 teaspoons finely grated fresh ginger
1 cup plain Greek-style yogurt
1¾ pounds boneless, skinless chicken thighs

For Masala Sauce

4 tablespoons ghee, divided
1 large onion, chopped
1 teaspoon cardamom
1-2 bay leaves
1 teaspoon smoked Spanish paprika
½ teaspoon red pepper flakes
1 teaspoon garam masala
1½ teaspoons sea salt
2 tablespoons finely grated fresh ginger
4 cloves garlic, minced or finely grated
1 serrano pepper, minced
2 tablespoons tomato paste
2 (14-ounce) can diced tomatoes
2 cups half and half
¾ cup coarsely chopped fresh cilantro
Juice of 1 small lemon (optional)

3 cups cooked basmati or jasmine rice

To make the marinade: Combine the garam masala, coriander, cumin, paprika, turmeric, salt, garlic, ginger, and yogurt in a bowl and stir. Add chicken thighs and toss to coat. Cover with plastic wrap and refrigerate 4 hours or overnight.

To make the masala: Add 3 tablespoons of the ghee to a Dutch oven set on medium-high heat. Add onion, cardamom, bay leaf (or leaves), paprika, pepper flakes, garam masala, and salt. Reduce heat to medium and cook, stirring occasionally, until onions are golden and tender, about 10 to 15 minutes.

Make space among onions in center of pot, and add the remaining 1 tablespoon ghee. When ghee has melted, add ginger, garlic, and serrano pepper, and sizzle for about 10 seconds. Stir into the onions. Stir in tomato paste, then add tomatoes and juice. Bring to a boil, then reduce heat and simmer, stirring often, until the liquid is almost gone, about 8 to 10 minutes.

Add cream and chopped cilantro to the pot. Taste and add salt if needed. Simmer over low heat, stirring occasionally, until sauce thickens, about 40 minutes. *

While sauce is cooking, grill chicken until done, and no pink remains in center. Cut chicken into bite-sized pieces. Stir into masala sauce, and serve over cooked rice. (If adding lemon juice, stir in just before serving. I forgot the lemon, and did not think it needed it!)

*NOTE: The original recipe called for pureeing the sauce in a blender at this point, before adding the chicken in. I thought that was an unnecessary step, but might try that next time I make this so the sauce is creamier. And there will be a next time for this tasty dish!

Better-Than-Take-Out Pizza Dough

IMG_0927You can make—and bake!—pizza made from this dough in the time it takes to order and pick up a pizza. I’ve been using this recipe to make personal pan pizzas for about 15 years now, and it’s always warmly welcomed by family and guests. This summer, my husband and I have used this dough to make and bake a couple pizzas in the Big Green Egg, and those are definitely killer. (Greek pizza pictured here—full recipe to come.) I’m posting this not only because it’s so easy and tasty, but because my scrawled pen and paper recipe is worn and tattered beyond legibility. My daughter-in-law Jess wanted to make this dough once, but she couldn’t make heads or tails of the faded chicken scratching on the recipe once she found it. So before this family fave is lost for all eternity, I’ll post it. And run a hard copy for back up. Cause that’s how I roll.

Oh, and where did I find this super simple gem? It was featured in a Family Fun magazine in the 90’s. It uses yeast, but really people, it’s nothing to be afraid of. Embrace the yeast! It’s your friend! This dough is no more difficult than mixing up a batch of Play-Doh. Only this, you can eat.

Makes 8 personal pan pizzas, or two 12-inch pizzas

1 cup warm tap water
2 1/2 teaspoons dry yeast (or 1 package, if using individual packets)
2 tablespoons olive oil
1/2 teaspoon salt
2 1/2 cups all-purpose flour, divided
olive oil
corn meal

Preheat oven to 425° Fahrenheit. Rinse large mixing bowl with hot water to warm it. (Especially important in winter to take the chill off the bowl, which could reduce water temp and keep yeast from rising properly.) Add warm water to bowl. Sprinkle yeast on top of water. Let stand 5 minutes, or until yeast is dissolved (water will be cloudy and/or foamy).

Stir in olive oil, salt, and 1 cup of the flour with large wooden spoon. Add remaining 1 1/2 cup flour and stir until dough begins to cling to spoon, and most of flour is incorporated into loose ball.

Sprinkle butcher block or large cutting board with flour. Drop dough down onto board, and knead by bringing outside edges in and punching them into the center of ball. Sprinkle flour on top when dough gets sticky. Repeat until dough is smooth and elastic. Pour 1-2 tablespoons of olive oil in a medium bowl and rotate to coat. Drop kneaded dough into oiled bowl, and then flip dough, so that whole ball is coated in oil. Cover with damp towel, and place in sink. Fill sink about a quarter or third with very warm water. Let dough rise for 30 minutes.

Punch dough down and toss onto floured board. Divide into 8 pieces for personal pan pizzas, or 2 pieces for a couple of 12-inch pizzas.

To make personal pan pizzas:

Lightly oil 3 baking sheets, and sprinkle with a light dusting of cornmeal. Form dough pieces into balls by binging outside edges in to center a couple times. Roll a ball out flat with rolling pin, about 8 inches in diameter. Place up to 3 crusts on a baking sheet, zig zagging to fit. Top with purchased marinara sauce, spreading to within 1 inch of edges. Add other toppings such as grated mozzarella cheese, chopped green peppers, onions, olives, mushrooms, pepperoni, sausage, etc. Bake in preheated oven for 12 minutes, with pans on top, middle and bottom racks. Rotate pans half way through baking – top to bottom, bottom to middle, and middle to top. Move to wire rack to cool for 5 minutes. Serve.

To make two 12-inch pizzas:

Lightly oil 2 round baking sheets, and sprinkle with a light dusting of cornmeal. Form each dough piece into a ball by binging outside edges in to center a couple times. Roll a ball out flat with rolling pin, about 12 inches in diameter. Move dough to prepared pans. Top with purchased marinara sauce, spreading to within 1 inch of edges. Add other toppings as desired. Bake in preheated oven for 12 minutes, rotating pans in oven halfway through baking. Slice and serve.

P.S. Changed the name of this recipe from Easier-than-take-out to Better-than-take-out, after reading my friend Peggy’s hilarious synopsis of her attempt at this dough in the comments below. In the end, she loved it! So it’s worth trying to get this one right.

Classic Baby Back Ribs

IMG_0681With the 4th of July just around the corner, it’s the perfect time to share our favorite baby back rib recipe. These super savory morsels of meat take a few hours on the charcoal grill, but they are totally worth the wait. My husband Rich found this recipe on Weber’s website, and aside from his apostasy of Weber and zealous love of his new-found Big Green Egg, he follows the recipe pretty closely—minus the homemade barbecue sauce. We have someone with an allergy to tomato-based foods in our family, so he avoids brushing any BBQ sauce onto the ribs while grilling. There is also a philosophy out there in manly grilling land that says adding barbecue sauce to meats makes them char, as tomato has a low burning point. Those in the “dry rub” camp say, add your sauce when you’re eatin’, not when you’re cookin’.

What goes great with these tender, smoky ribs? Any of these recipes already posted on my blog: Corn Bread or Savory Sweet Potato Biscuits, Curry Cabbage and Vegetable Salad, Mean Mexican Rice or Baked Beans with Bacon and Caramelized Onions. For refreshments, try Mint Lemon Sweet Tea, Fresh Lemonade, or Rhubarb Mint Coolers—and follow your super summer meal up with warm Strawberry Rhubarb Crisp. My mother-in-law Marynona’s famous Potato Salad recipe (another summer time staple) will be posted soon. Never fear—I’ll be sure all your warm-weather dietary desires are covered!

Serves 4 to 6

Rub

2 tablespoons kosher salt
2 tablespoons paprika
4 teaspoons granulated garlic
4 teaspoons pure chili powder
2 teaspoons ground black pepper
1 teaspoon ground cumin

Ribs

4 racks baby back ribs, each about 2 pounds
4 medium chunks of hickory wood, soaked in water for at least 30 minutes

Mop

1 cup apple juice
3 tablespoons cider vinegar
2 tablespoons unsalted butter
2 tablespoons barbecue sauce (from above)

Mix all the rub ingredients in a small bowl. Set aside.

Using a dull knife, slide the tip under the membrane covering the back of each rack of ribs. Lift and loosen the membrane until it breaks, then grab a corner of it with a paper towel and pull it off. Season the ribs all over with the rub, putting more on the meaty sides than the bone sides. Arrange the ribs in a rib rack, with all the ribs facing the same direction. Allow the ribs to stand at room temperature for about 30 minutes, or until the surface looks moist, before grilling.

Fill a chimney starter to the rim with charcoal and burn the charcoal until it is lightly covered with ash. Spread the charcoal in a tightly packed, single layer across one-third of the charcoal grate. Place a large disposable drip pan on the empty side of the charcoal grate. Fill the pan about halfway with warm water. Let the coals burn down to low heat (250° to 300°F). Leave all the vents open.

When the fire has burned down to low heat, add two hickory wood chunks to the charcoal. Put the cooking grate in place. Place the rib rack over indirect low heat (over the drip pan) as far from the coals as possible, with the bone sides facing toward the charcoal. Close the lid. Close the top vent about halfway. Let the ribs cook and smoke for 1 hour. During that time, maintain the temperature between 250° to 300°F by opening and closing the top vents. Meanwhile, make the mop.

Make mop: In a small saucepan mix the mop ingredients. Simmer for a few minutes over medium heat to melt the butter, and then remove the saucepan from the heat. Or melt butter in microwave, and add other mop ingredients and stir.

After the first hour of cooking ribs, add 8 to 10 unlit charcoal briquettes and the remaining two wood chunks to the fire. At the same time, lightly baste the ribs with some mop. Leaving the lid off for a few minutes while you baste the ribs will help the new briquettes to light. Close the lid and cook for another hour. During that time, maintain the temperature of the grill between 250° to 300°F by opening and closing the top vents.

After 2 hours of cooking ribs, add 8 to 10 unlit charcoal briquettes to the fire. Remove the ribs from the rib rack, spread them out on clean work area and baste them thoroughly with some mop. Put them back in the rib rack, again all facing the same direction, but this time turned over so that the ends facing down earlier now face up. Also position any ribs that appear to be cooking faster than others toward the back of the rib rack, farther from the charcoal. Let the ribs cook for a third hour. During that time, maintain the temperature between 250° to 300°F by opening and closing the top vents.

After 3 hours of cooking ribs, check if any rack is ready to come off the grill. They are done when the meat has shrunk back from most of the bones by ¼ inch or more. When you lift a rack by picking up one end with tongs, the rack should bend in the middle and the meat should tear easily. If the meat does not tear easily, continue to cook the ribs. The total cooking time could be anywhere between 3 to 4 hours. Not all racks will cook in same amount of time. Lightly brush the cooked ribs with some sauce and, if desired for crispiness, cook them over direct heat for a few minutes. Transfer to a sheet pan and tightly cover with aluminum foil. Let rest for 10 to 15 minutes before serving. Serve warm with barbecue sauce on the side.

Brined and Smoked Turkey

Smoked Turkey IMG_0616A man and his meat. It’s a beautiful thing. My husband Rich loves, loves, LOVES to grill, and with the recent addition of a Big Green Egg to his fleet of fiery furnaces, he’s learning a whole new way to barbecue. This brined turkey recipe from Weber Grill’s website has received rave reviews from the guests at our table, so I think it’s safe to say it’s a keeper. (He’s followed the recipe for the brine, but not tried the gravy yet, so that portion of the recipe is not included. The instructions below are for the Green Egg process which is charcoal, not a gas Weber grill.) Marinating in the brine takes 12-18 hours, and the smoking takes about 4-7, depending on the size of your bird. If it’s gorgeous out, it’s a great excuse for a guy to sit on the deck, soaking in the sunshine and enjoying the scent of smoked meat wafting through the air. If it’s cold and snowy (like this Christmas, when Rich smoked a bird for the extended family), it’s a labor of love. If he’s willing to labor, we’re willing to love it.

turkey on grillCouple tips. Rich found that the suggested 18-24 hours of brining made the bird far too salty, so he’s cut the brining time down considerably. He’s also found a handy chart on the Big Green Egg website with turkey tips. Rich slapped some slices of bacon on the big birds about halfway through smoking them. Why? Why not! He likes bacon.

In the photo at right, the two smaller birds are pheasants. Our son Brandon brought those pre-brined to a family party, and brushed reduced maple syrup on them as they smoked. Mmmmmmmmm. They were delicious.

Serves 8-12

For Brine

2 quarts apple juice
1 cup kosher salt
2 tablespoons dried rosemary
2 tablespoons dried thyme
1 tablespoon dried sage
1 teaspoon coarsely ground black pepper

For Turkey

1 whole turkey, 10 to 12 pounds, fresh or defrosted
1/2 cup unsalted butter, melted, divided
1 teaspoon freshly ground black pepper

Cooper and ChesterIn a large pot combine the brine ingredients. Stir vigorously until the salt is dissolved. Remove the neck and giblets from the turkey (and cook giblets for your dogs—our dog Cooper, and our granddog Chester love this part). Rinse the turkey inside and outside with cold water.

Partially fill a cooler with ice. Open a large, sturdy plastic bag in the cooler. Place the turkey, breast side down, in the bag. Carefully pour the brine over the turkey and then add 3 quarts of cold water. The turkey should be almost completely submerged. If some of the back is exposed above the brine, that’s fine. Press the air out of the bag, seal the bag tightly, close the lid of the cooler, and set aside for 12 to 18 hours.

Smoking Turkey

If using wood chips, soak in water for at least 1 hour (no need to soak wood chunks). For charcoal grill, fill a chimney starter to the rim with charcoal and burn the coals until they are lightly covered with ash. You will want to smoke turkey with indirect heat, so place coals to side of cooking area. Carefully place a large, disposable drip pan in the center of the charcoal grate and fill it about halfway with warm water. This will help to maintain the temperature of the fire. Put the cooking grate in place, close the lid, bring the heat up to 350° Fahrenheit with all vents open. Then set vents to almost closed to reduce to low heat (200°). (If using a gas grill, follow manufacturers instructions for smoking.)

Remove the turkey from the bag and rinse it, inside and outside, with cold water. Pat dry with paper towels. Discard the brine. Lightly coat the turkey with some of the melted butter. Season with the pepper.

Add two wood chunks or two handfuls of wood chips (drained) to the charcoal, and close the lid. When the wood begins to smoke, place the turkey in the center of the cooking grate. Position the bird so the turkey legs face the charcoal. Cook the turkey over indirect low heat, with the lid closed, for 1 hour.

After 1 hour, turn turkey breast-side up, and add more wood chips. Close the lid, and watch until the temperature is back up to 200°. Continue to cook the turkey with the lid closed, for a second hour, maintaining that 200° temperature.

At the end of the second hour, baste the turkey all over with the remaining butter. If any parts are getting too dark, wrap them tightly with aluminum foil. Continue to cook the turkey. The total cooking time will be 4-6 hours. The turkey is done when the internal temperature reaches 160° to 165° in the thickest part of the thigh (not touching the bone).

Transfer the turkey to a cutting board, loosely cover with foil, and let rest for 20 to 30 minutes before carving (the internal temperature will rise 5 to 10 degrees during this time). Carve the turkey, and serve.